


Blue Unit: Computational Tinkering
3B: Build Functions for Remixable Code
Background Knowledge Probe
Reusing/remixing code is a central tenet of the free and open source software movement. And indeed, it’s a central tenet of the Internet, as we’ll discover in the Rainbow Unit. But as we’ve discovered throughout the book and especially highlighted in The Unknown Tech Innovators, there’s also an active work to give the credit for innovations to certain people, and particularly to white males.
Take a few minutes now to reflect back on the innovative designers and builders of the code we’re now using for our own Community of Practice works, and especially those hidden and forgotten that we’ve worked to bring forward as part of our explorations.
-
- How has their work helped shape your own use and reuse/remixing works?
- In what ways might your remixes be used by others in their works?
Technical Review
 Compare this to the “Middle C Scale Toolbox Trumpet” exercise. Here, we committed our attention to deductive reasoning and to guide us in the creation of an appropriate, functional sequence of , thereby playing the notes in order from Middle C to Middle B.
Exercise: Variables & Functions Remix of the Toolbox Trumpet
Let’s begin by considering how we could remix the Toolbox Trumpet using variables and functions to expand the capabilities of this tool.
Steps: Creating a binary to decimal calculator
To begin, we will create a new variable and use conditionals to collect the values, 000 to 111, provided using the three “valves.” We will use this to calculate the decimal notation equivalent, 0, 1, 2, 3, 4, 5, 6, or 7.[1]
- In the VARIABLES category, create a new variable called
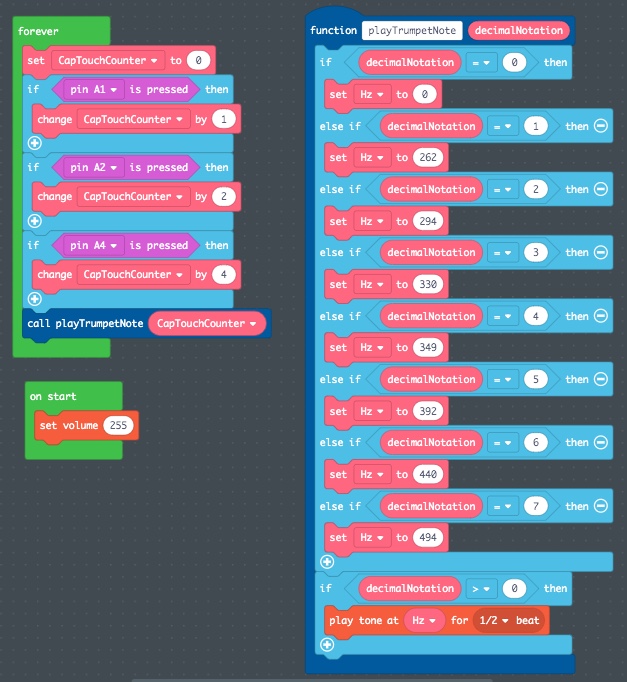
CapTouchCounter. This will be used to determine which capacitive touch sensor “valve” or “valves” are pressed in that sequence. - Drag a “set CapTouchCounter to 0” block from the VARIABLES category and place it in the default FOREVER function.
- Add three “If…Then” blocks from the LOGIC category to the FOREVER function, and configure them using a “button A is pressed” block from the INPUT category to have conditionals for pin A1, pin A2, and pin A3.
- In each of the “If…Then” conditionals, add a “change CapTouchCounter by” block. Set the pin A1 conditional so that CapTouchCounter is changed by 1. Set the pin A2 conditional so that CapTouchCounter is changed by 2. Set the pin A3 conditional so that CapTouchCounter is changed by 4.
- Under advanced, go down to the CONSOLE category. From there, drag a “console log” block and add it as the last line of code in the new FOREVER function.
- Finally, from the VARIABLES category, drag a “CapTouchCounter” block and drop it into the right oval window of the “console log” block.
Here’s a video screenshot of these steps to compare with your own process. Feel encouraged to change 1X to 2X to play it back at high speed. Note that the console provides a means to enter a new level of testing within the simulator. Remember that we cannot test the pressing of multiple capacitive touch sensors simultaneously. At this point, we can only assume the “change” statement will add in the value, rather than replacing the previous value.
Steps: Playing the Middle C Scale
As we move forward, much of the time we use our Circuit Playground Express, we may want to use these to select a digital counterstory to play through speakers rather than playing the notes of a C scale. Sometimes we may want to do both. Sometimes we’ll want to use the calculations for yet other purposes.
For this reason, we will now create a new function called playTrumpetNote. We’ll pass the CapTouchCounter value to the function and set it up to determine the Hertz the note should be played at.
- From within the ADVANCED category, open the FUNCTIONS category. Within FUNCTIONS, click on “Make a Function.”
- Replace “doSomething” with the name
playTrumpetNote. - Add a parameter “Number” and replace “num” with “decimalNotation.”
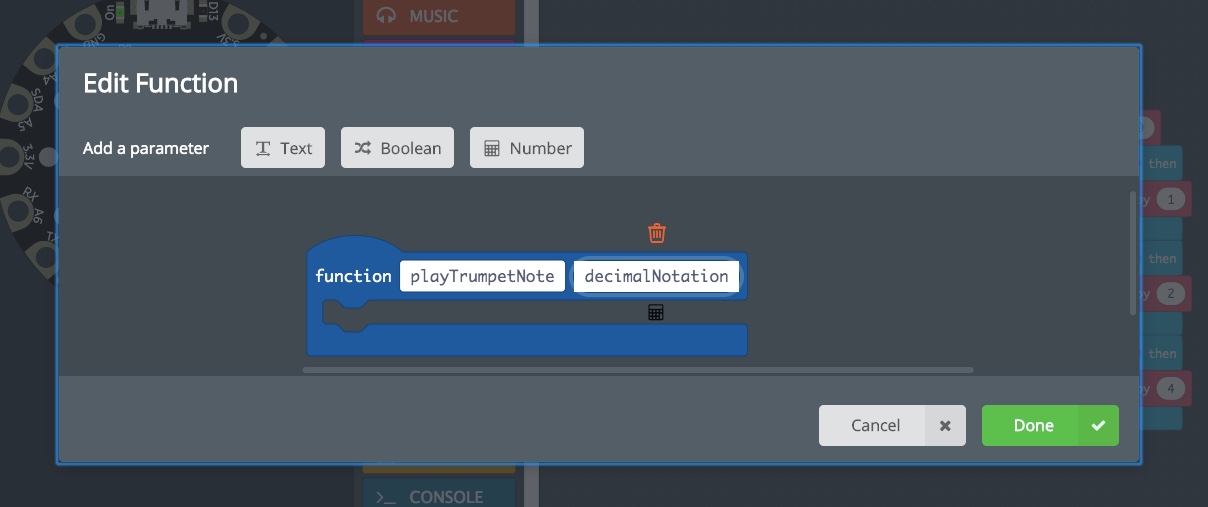
- Replace “doSomething” with the name
- From the FUNCTIONS category, drag the “call playTrumpetNote 1” and drop it at the bottom of the current FOREVER function, beneath and NOT WITHIN the end of the “If pin A4 is pressed Then” block.
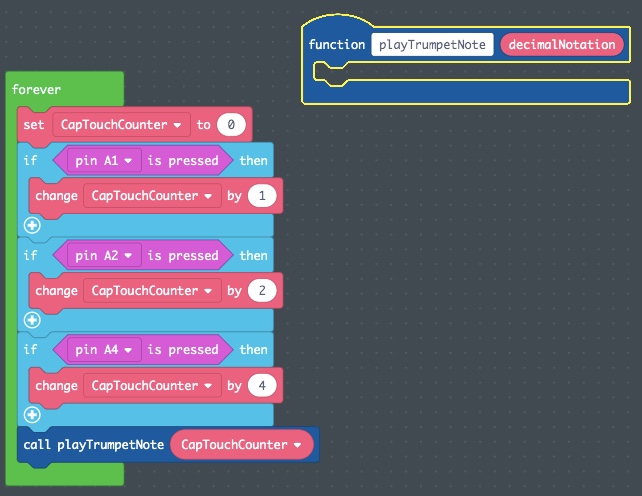
- Drag a “CapTouchCounter” block from the VARIABLES category and drop it into the “call playTrumpetNote 1” function, replacing the number 1.
-
- A number from 0 to 7 will now be sent to the function playTrumpetNote every time we call it.
- We’ll now use eight “If…Then…ElseIf” logic tests to work through the possible different decimal notation values we may receive given the 0 to 7 decimal scale we might receive via the function call.
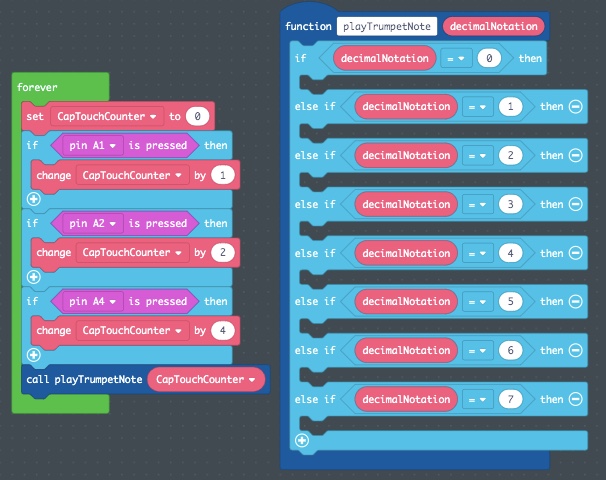
- In the VARIABLES category, create a new variable called
Hz. - Drag the “set Hz to 0” block into the “If decimalNotation = 0” logic statement.
-
- When the variable decimalNotation is equal to 0, no capacitive touch sensors are currently pressed, so no note should be played.
- Copy and paste this “set Hz to 0” 7 times, putting one in each of the remaining “If decimalNotation =” logic statements. Set the Hz to the following numbers:
| decimalNotation | Note | Hz |
|---|---|---|
| 0 | Silent | 0 |
| 1 | Middle-C | 262 |
| 2 | Middle-D | 294 |
| 3 | Middle-E | 330 |
| 4 | Middle-F | 349 |
| 5 | Middle-G | 392 |
| 6 | Middle-A | 440 |
| 7 | Middle-B | 494 |
- From the LOGIC category, drag over one additional “If…Then” logic statement and add beneath the last “else If decimalNotation = 7 Then” conditional.
- To this new “If…Then” logic statement, replace “True” with a “<0 = 0>” comparison statement from the LOGIC category, within the Comparison section.
- Replace the left 0 with a “decimalNotation” variable block.
- Change the “=” comparison to a “>” comparison.
- This will assure that a tone will only be played if one or more of the “valves” is pressed.
- Finally, from the MUSIC category, drag a “play tone at Middle C for 1/2 beat” and place it within the new “If decimalNotation > 0 Then” conditional statement.
- Drag a “Hz” block and drop it into the “play tone at Middle C for 1/2 beat” block, replacing the “Middle C” window.
- Take a few minutes to test this out in the simulator. Then save this as
ToolboxTrumpetMiddleC-variablesFunction, and flash it to your physical Circuit Playground Express for further testing.
Key Takeaways
Functions serve to run certain control flow statements and other code when called upon by other parts of the program. Indeed, MakeCode itself is written using many thousands of lines of code, most of which we do not see or even know about. But within that code, they make a call to the FOREVER function we create. This is the MakeCode implementation of the Clocked Sequence Programming I did as a graduate student back in 1990 to collect data from a controller I designed to do my own research. Then it was in the C programming language, but the lines of code themselves have a lot of similarities.
By moving the playing of a note into its own function, we can now use the more general capTouchCounter value for a wider range of activities beyond just playing a note in a C scale, and potentially even instead of that.
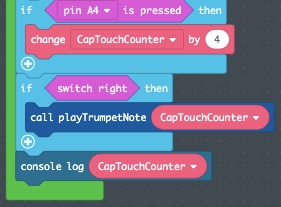
Indeed, take a moment to drag an “If…Then” logic block from the LOGIC category and drop it around the “call playTrumpetNote CapTouchCounter” block. Then, at the very bottom of the INPUT category, drag out a “switch right” block and replace the “True” statement within this “If…Then” logic block. Save and flash this to your Circuit Playground Express. Now, depending on the position of the slide switch located at D7 on the Circuit Playground Express, the notes of your scale will or will not be played when pressing the “valves.” However, the CapTouchCounter values will still be calculated, as seen if you use a CONSOLE category “console log” block to record the “CapTouchCounter” value.
Exercise: 4-Octave Toolbox Trumpet
In “Essential Coding Concepts,” we set up the momentary switch push buttons so that the blue LED was on unless button A was pressed, and the white LED was off unless button B was pressed. Essentially, this was equivalent to:
- No buttons = 1 LED
- Left button = 0 LEDs
- Right button = 2 LEDs
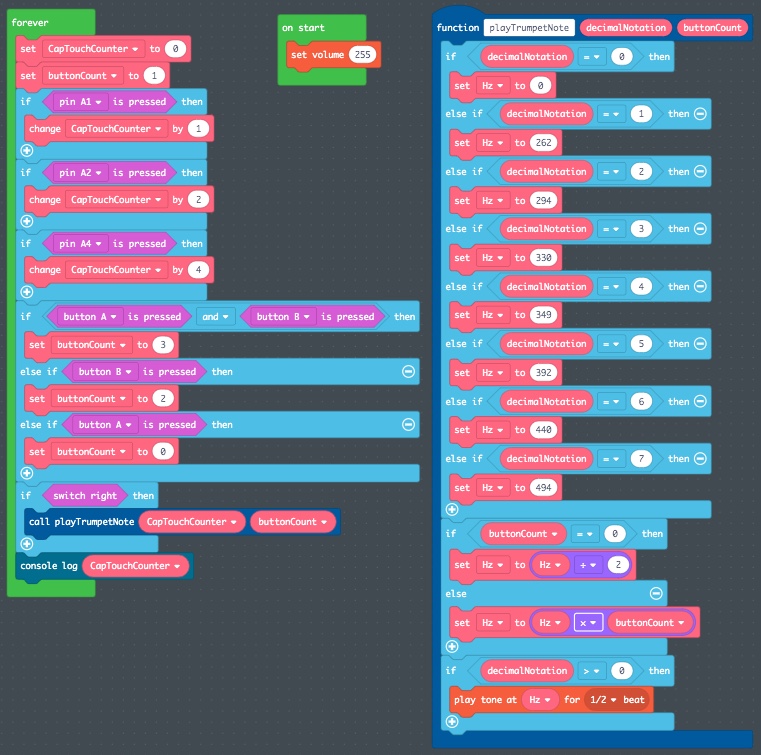
This design could be seen as equivalent to the Middle C scale with no buttons pressed, Low C scale with button A pressed, and High C scale with button B pressed. Let’s do a remix of our code to see how an electronic device can do the same thing, sometimes with added functionality, by remixing the lines of code. To do this, we’ll add these calculations into the FOREVER function, and then pass them on to the playTrumpetNote function.
Steps and images are provided. Or, you can download the completed file:
circuitplayground-ToolboxTrumpet4Octave-variablesFunc.uf2Open and review it in MakeCode, and flash it to your Circuit Playground Express for further prototyping.
The key additions:
- Add a new variable called
buttonCountto conduct three “If…Then” conditionals, setting buttonCount to 0 if only Button A is pressed, to 2 if Button B is pressed, and to 3 if both Button A and Button B are pressed. Otherwise, buttonCount remains at its default of 1. - Pass buttonCount as a second number to the function
playTrumpetNote. - Divide the variable Hz by 2, taking it down one octave, if buttonCount is 0. Else, the variable Hz is multiplied by buttonCount. If neither button was pressed, it equals 1 and the Hz stays in the middle octave. If button B is pressed, the Hz is multiplied by 2 and it goes up one octave. If both buttons are pressed, it is multiplied by 3, and the Hz goes up two octaves.
Steps
- Create a new variable called
buttonCount. At the top of the FOREVER function, add a “set buttonCount to 1” block so that in each iteration, this value is reset to the value if neither button is pressed. - Add a new set of “If…Then” logic statements, such that:
- If button A is pressed and button B is pressed, then set buttonCount to 3.
- Else if button B is pressed, then set buttonCount to 2.
- Else if button A is pressed, then set buttonCount to 0.
- Right click on the “call playTrumpetNote” and select “Edit Function.” Add a new number parameter and call it “buttonCount.”
- In the “call playTrumpetNote” function, add a “buttonCount” block as the second number in the function call.
- Between the “decimalNotation” “If…Then…ElseIf” logic statements and the “If decimalNotation > 0 Then” conditional statement, add in a new “If…Then…Else” logic block from the LOGIC category. Configure this sequence of lines of code such that:
- If buttonCount = 0, then set Hz to Hz ÷ 2.
- Else, set Hz to Hz × buttonCount.
Wrap Up
We should now have two variables, CapTouchCounter and buttonCount, that we can pass to functions. As a part of the “Comprehension Check” for this session, let’s next look at how these variables can be remixed in different functions.
Comprehension Check
Do Something New!
We’ve used the LED Pixels as indicator lights and even 5 digit counters in a few exercises now. As a “Comprehension Check,” create a new LED Pixel Counter function to do the same with our Toolbox Trumpet. Indeed, this can prove helpful if we’ve forgotten we have the sliding switch to the left, keeping the Toolbox Trumpet notes from being played by the Circuit Playground Express speaker. Record a video image of this being run from your physical Circuit Playground Express, as well as a copy of a screenshot of this new function as a way of demonstrating you’ve learned the core steps to create a new function.
Design Criteria
- Open up the “ToolboxTrumpet4Octave” project in MakeCode. Rename this as “ToolboxTrumpet4Octave-pixelCounter” and click on save.
- Create a new function called “pixelCount” and add in the number called “digitalNotation” and the number called “buttonCount.”
- Create blocks of code such that pixel 9 is one of four colors, depending on the value of the variable “buttonCount.”
- Create blocks of code such that pixels 0 to 6 are turned on to match “digitalNotation − 1” and off if no values are pressed.
Here’s a short video demonstrating a simulator test of the prototype I created.
- MakeCode © 2020 Microsoft and Adafruit. Screenshots used with permission. ↵
A convenient name to represent numbers that change from time to time. Look at the top of your smartphone, and you may see the battery percentage charge remaining. A program exists on the smartphone to read this variable and provide a visual representation of it. Variables are often used within code to evaluate changes in patterns to determine which series of code should be executed at a given moment.
Lists and arrays are two commonly used ways to store data. A list is a set of data arranged in some order. Lists are mutable, meaning that the order of the items within the list can change. This allows for sorting, shuffling, adding, and deleting items from the list. One form of lists, called an array, is an indexed set of related elements associating one thing with another and are especially useful in control flow loops such as button counters. However, insertion or deletion of items within an array's list can prove difficult.
A unit of code defined by its role within a more general code structure. To execute the function, it is provided one or more inputs, and produces a concrete result. This result may, but is not necessarily required to, be returned back to the caller of the function.
A form of algebra used in mathematics, electronics, and computer hardware and software. At its base, all values are found to be either true or false using the Boolean operators "OR," "AND," and "NOT."
A command that determines under which a specific path should be executed based on the occurrence of another sequence in the program.
Binary notation is based on the base-2 numeral system using only two symbols. The symbols used are the digits 0 and 1. Binary is the standard notation for Boolean true or false logic tests. This is in contrast to the base-10 numeral system commonly used in the English language, and which uses the digits 0, 1, 2, 3, 4, 5, 6, 7, 8, and 9.
