


Rainbow Unit: Networks Big and Small
1B: Connecting Our Electronic ‘Thing’ to a Wider World
Technical Overview
As we saw at the end of the Orange and Blue Units, there are many ways to provide data communications between devices. In the Orange Unit, we learned more about the ports available on our computers, such as the and ports, that provide ways for us to connect external devices such as keyboards, mice, and monitors. And in the Blue Unit, we learned about serial data communications interfaces such as the interface we’ve been using to transmit and receive data between the Raspberry Pi and the screen or PuTTY console of our laptop, and between the Circuit Playground Express and our Raspberry Pi. While technically a keyboard and a computer or a microcontroller and a microcomputer are two separate devices, via the software we use, they work as one unified system. They are our computer. They are our counterstory trumpet.
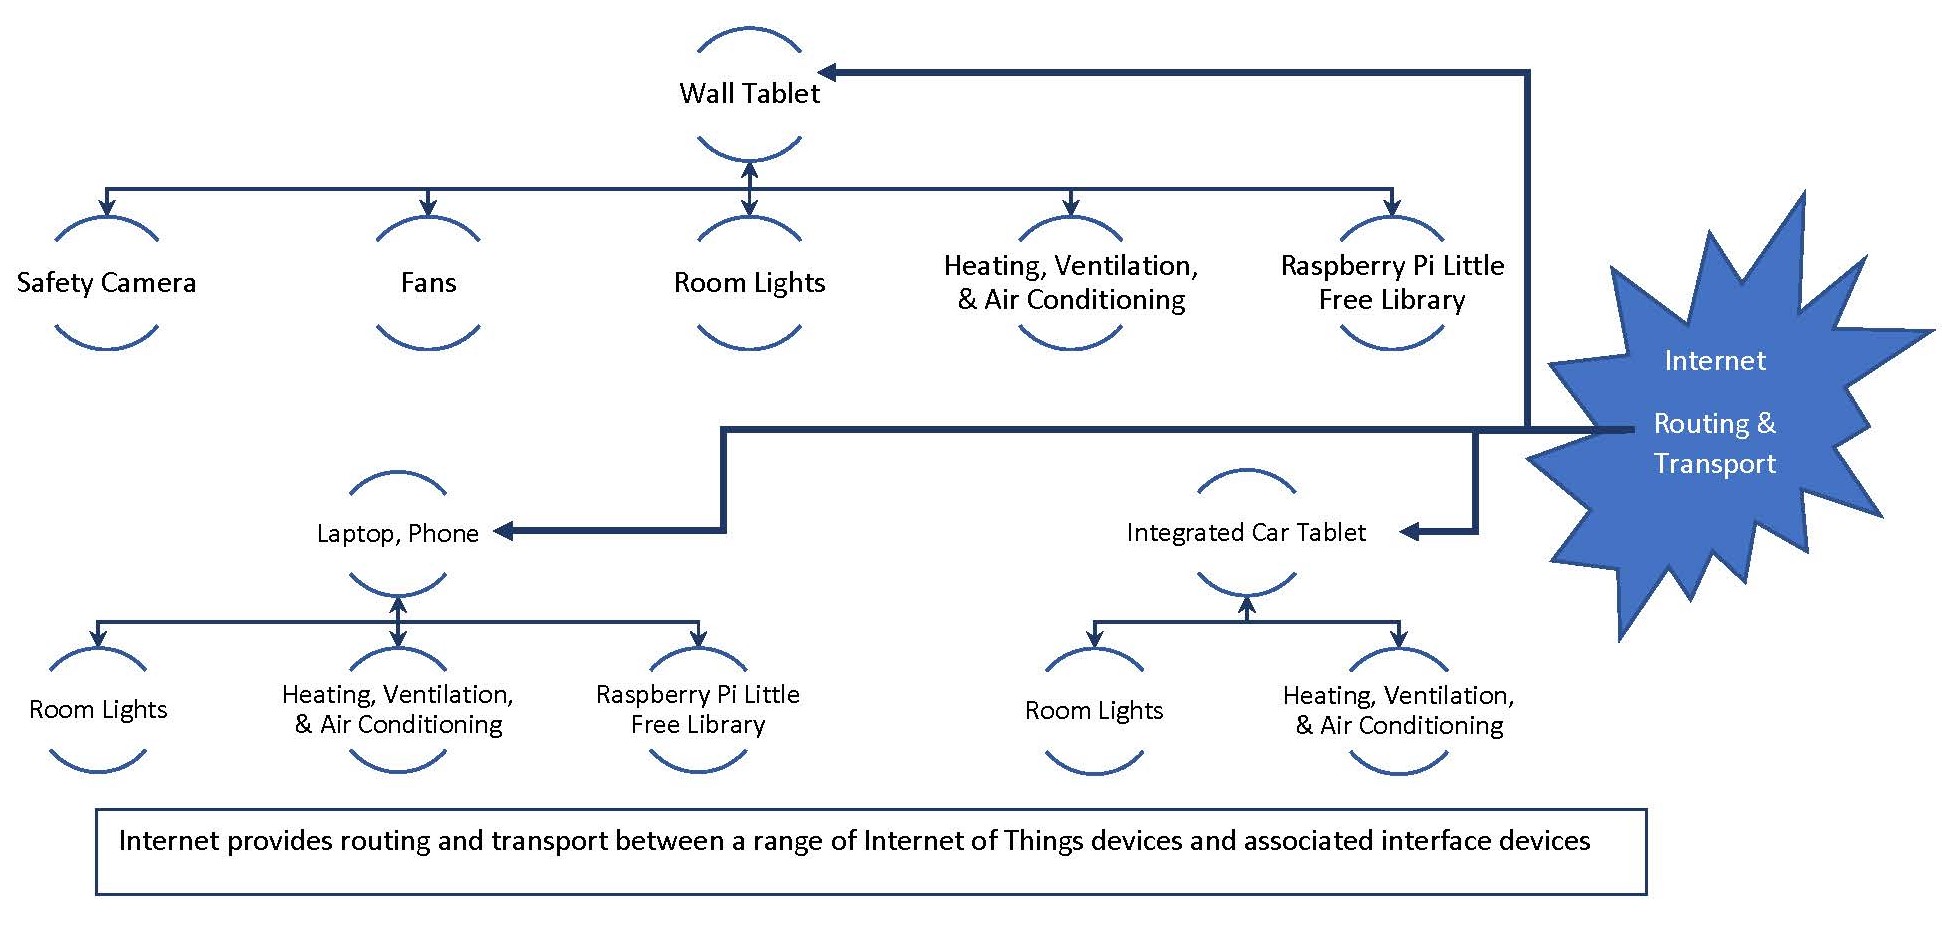
But underlying the concept of the Internet of Things—which today is often popularly referred to as Smart Devices coming together to create Smart Homes, Smart Grids, Smart Cities, and more—is an interconnection of electronics. A mechanical keyboard connected to a personal computer is not an IoT device. But a programmable keyboard that uses machine learning to predict changing contexts based on data from a range of local IoT devices and functionally evolve accordingly would be an IoT keyboard. It is to create an Internet of Things, whether or not this is connected to the physical Internet. There are actually many choices that can be made regarding this interconnectivity, only some of which make use of the Internet Protocol, something we’ll learn more about in session two of the Rainbow Unit.
Data Transport
As the evolution of computer networking continued into the 1970s, a number of different government- and corporate-sponsored programs led to the development of protocols, standards, and frameworks for data, information, and communication distribution between computers. This included CYCLADES in France, NPL network in the UK, and ARPANET in the United States. Through extended work by international bodies such as the International Organization for Standardization (ISO) and the Telecommunications Standardization Sector of the International Telecommunication Union (ITU-T), an Open Systems Interconnection (OSI) reference model was created and formally published in 1984 as both ISO 7498 and X.200. A key component of the OSI is a seven-layer model.
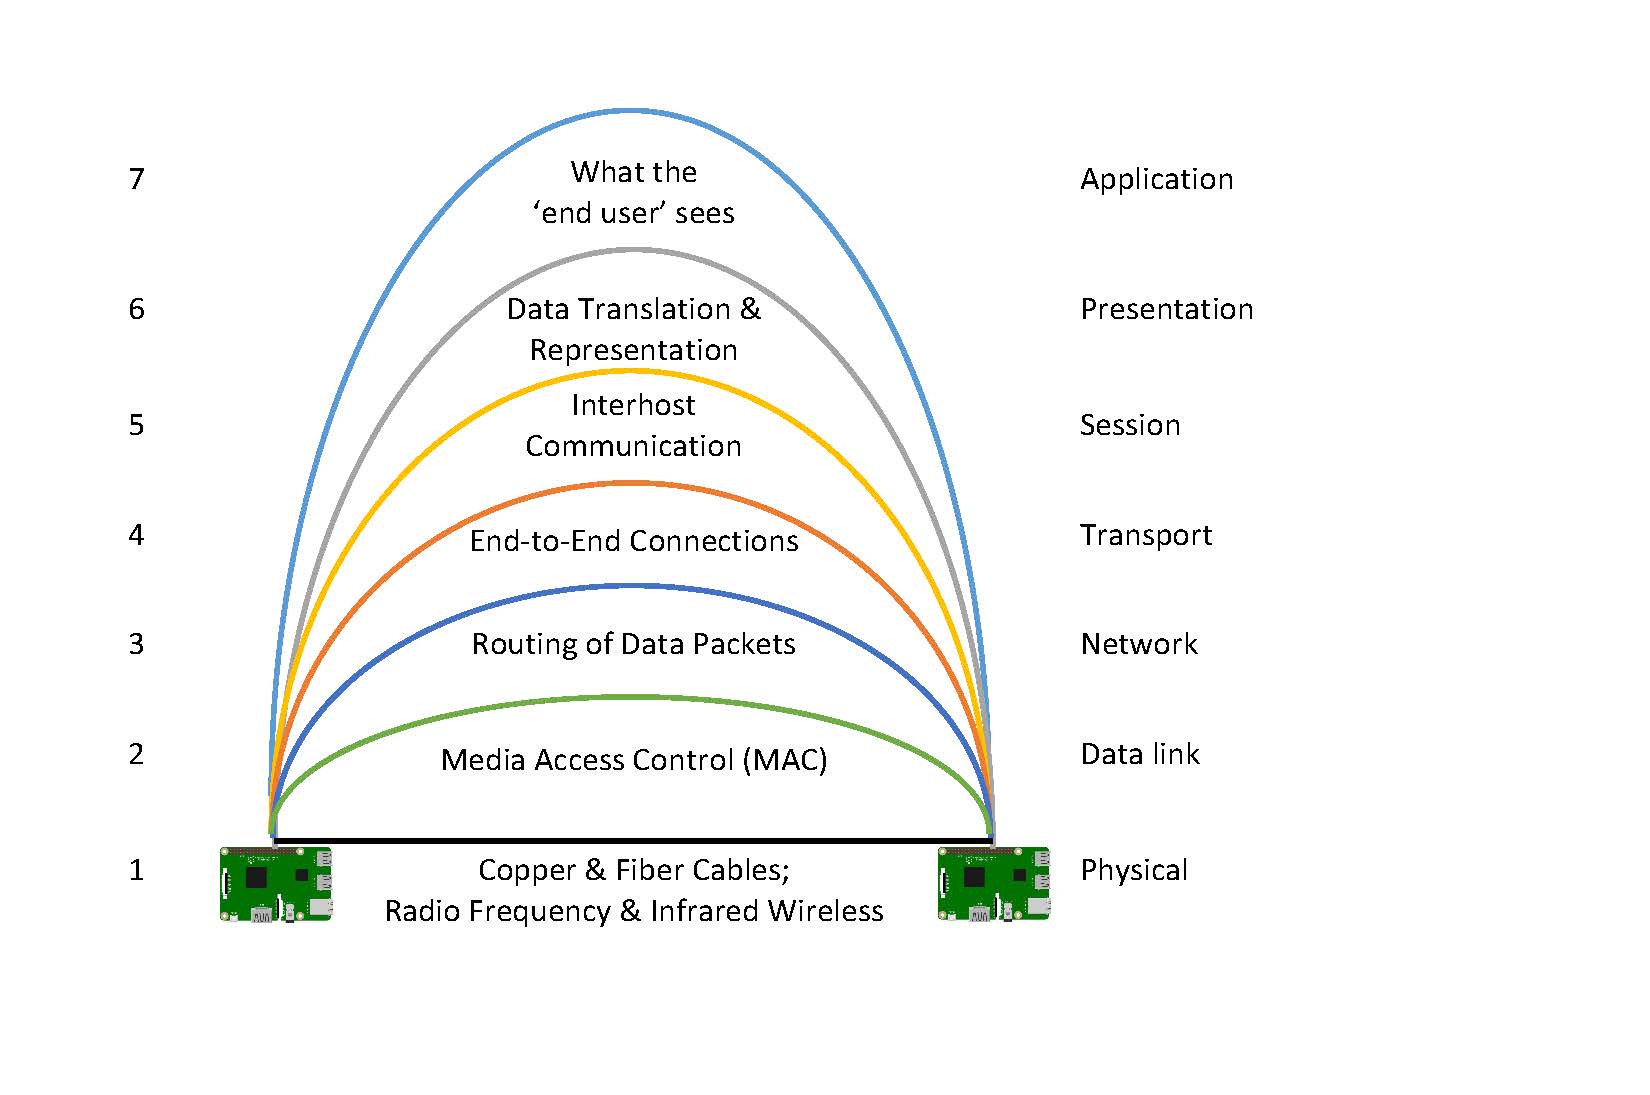
With regard to the Internet, these layers are practically combined into four groups, as follows:
| Application & Presentation Layers | Provide the physical client/server (e.g. web browser client/, server and , database server) or (e.g., Bittorrent, Bitcoin) applications with which end users work & the data translation and representation used in support of those applications |
| Session & Transport Layers |
Provide interhost communication and connections using protocols such as the and . While TCP is the most commonly used, leading to the standard TCP/IP suite reference, UDP is used when speed is prioritized over occasional dropped packets, for instance in live streaming and online gaming contexts. |
| Network Layer | The core of the used to provide end-to-end routing of data packets across the backbone |
| Physical & Data Link Layers | The unique identifiers associated with key hardware devices and the communications technology used to interconnect these devices |
Limor Fried of Adafruit Industries partnered with DigiKey to create the web series “All the Internet of Things,” highlighting essential tools for building Internet of Things devices. Traditional Internet-based systems and structures combine the seven layers into four groups as listed in the table above. But Internet of Things applications often focus on the Physical and Data Link, Network, and Transport layers, as is highlighted in the video.
To prepare for our own work in the Rainbow Unit, watch the first 13 and a half minutes of Fried’s review of Ethernet and Wi-Fi transport (read the full video transcript on Adafruit’s website).
Data transfers between Internet of Things devices do not always (or even often) require human-computer interaction. The applications commonly used within Internet of Things devices do typically make use of common protocols such as HTTP and SQL that work within the Session and Presentation layers of the OSI model, but often can do so without the need for human-computer interfaces such as a web browser, or use the human-computer interface only occasionally for testing and configuration/programming purposes. In episode two of “All the Internet of Things,” Fried introduces us to commonly used application protocols including HTTP, which we’ll be using in the exercises below.
To get started, watch the first 4:10 of the video. For those wanting to do a deeper dive, you may consider watching through minute 11:04 to learn about the REST API (Application Programming Interface) that can be used with HTTP to create more extensive intercommunication between devices (read the full video transcript on Adafruit’s website).
Towards Our Own Internet of Things
In the following three exercises, we will work with the key components used to create IoT devices.
- First, we will return to the MakeCode Serial UART Communications Extension used with the Raspberry Pi Counterstory Digital Little Free Library exercises from session four of the Blue Unit. This time, we’ll add in temperature and light sensor data to the A1, A2, and A4 touchpad and A and B push button sensors. We’ll also include the current runtime of the Circuit Playground Express since it was last powered on or rebooted, providing five unique data points. We will transfer this data to the Raspberry Pi via the UART connection every second. A simple Python application run on the Raspberry Pi will then print these to a terminal window.
- Second, instead of displaying this data within a terminal window, we’ll display the data within a dynamic Hypertext Markup Language (HTML) document, viewable from a web browser client. Starting with Python version 3, Python code can be used to set up an HTTP server, watching for HTTP client requests for data. When a client request is received, the server dynamically creates an HTML page providing the real-time data, previously collected data, static text, or a combination of the above.
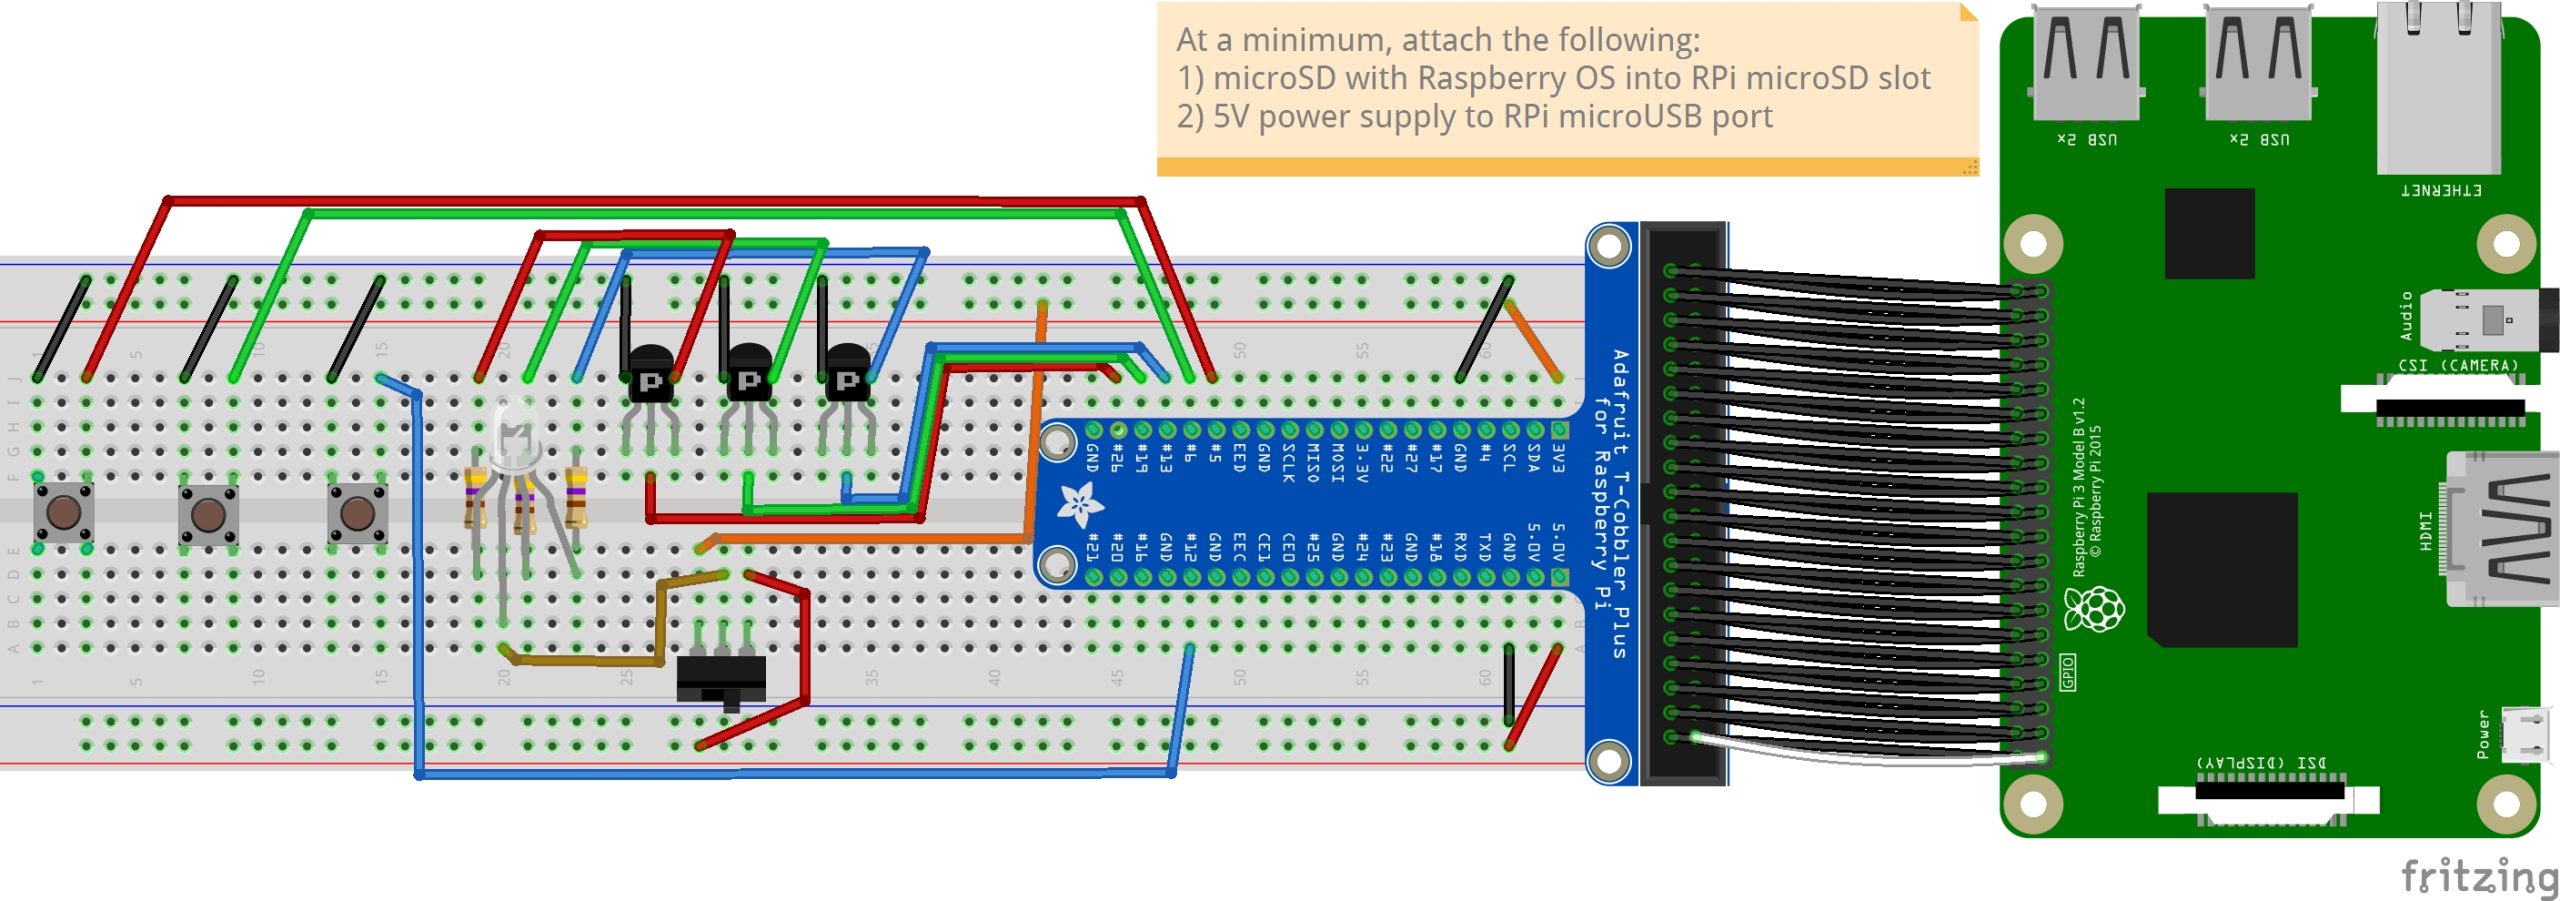
- Third, we will add the option to power LEDs on and off from a web browser. To accomplish this, we can use Python code, bringing together the HTTP server code from exercise two with code from the Coding Electronics chapter in the Orange Unit. Two options are available: The first uses the push buttons and LEDs as configured in the Orange Unit Coding Electronics chapter. The second uses a diffused RGB (Red, Green, Blue) LED to allow us to choose one of seven different colors for the LED display.
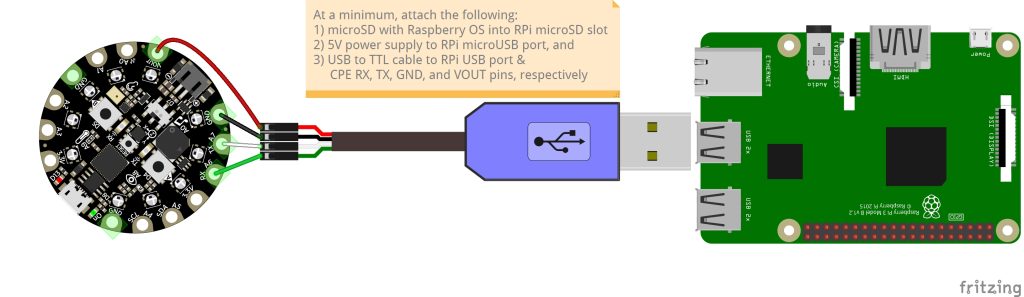
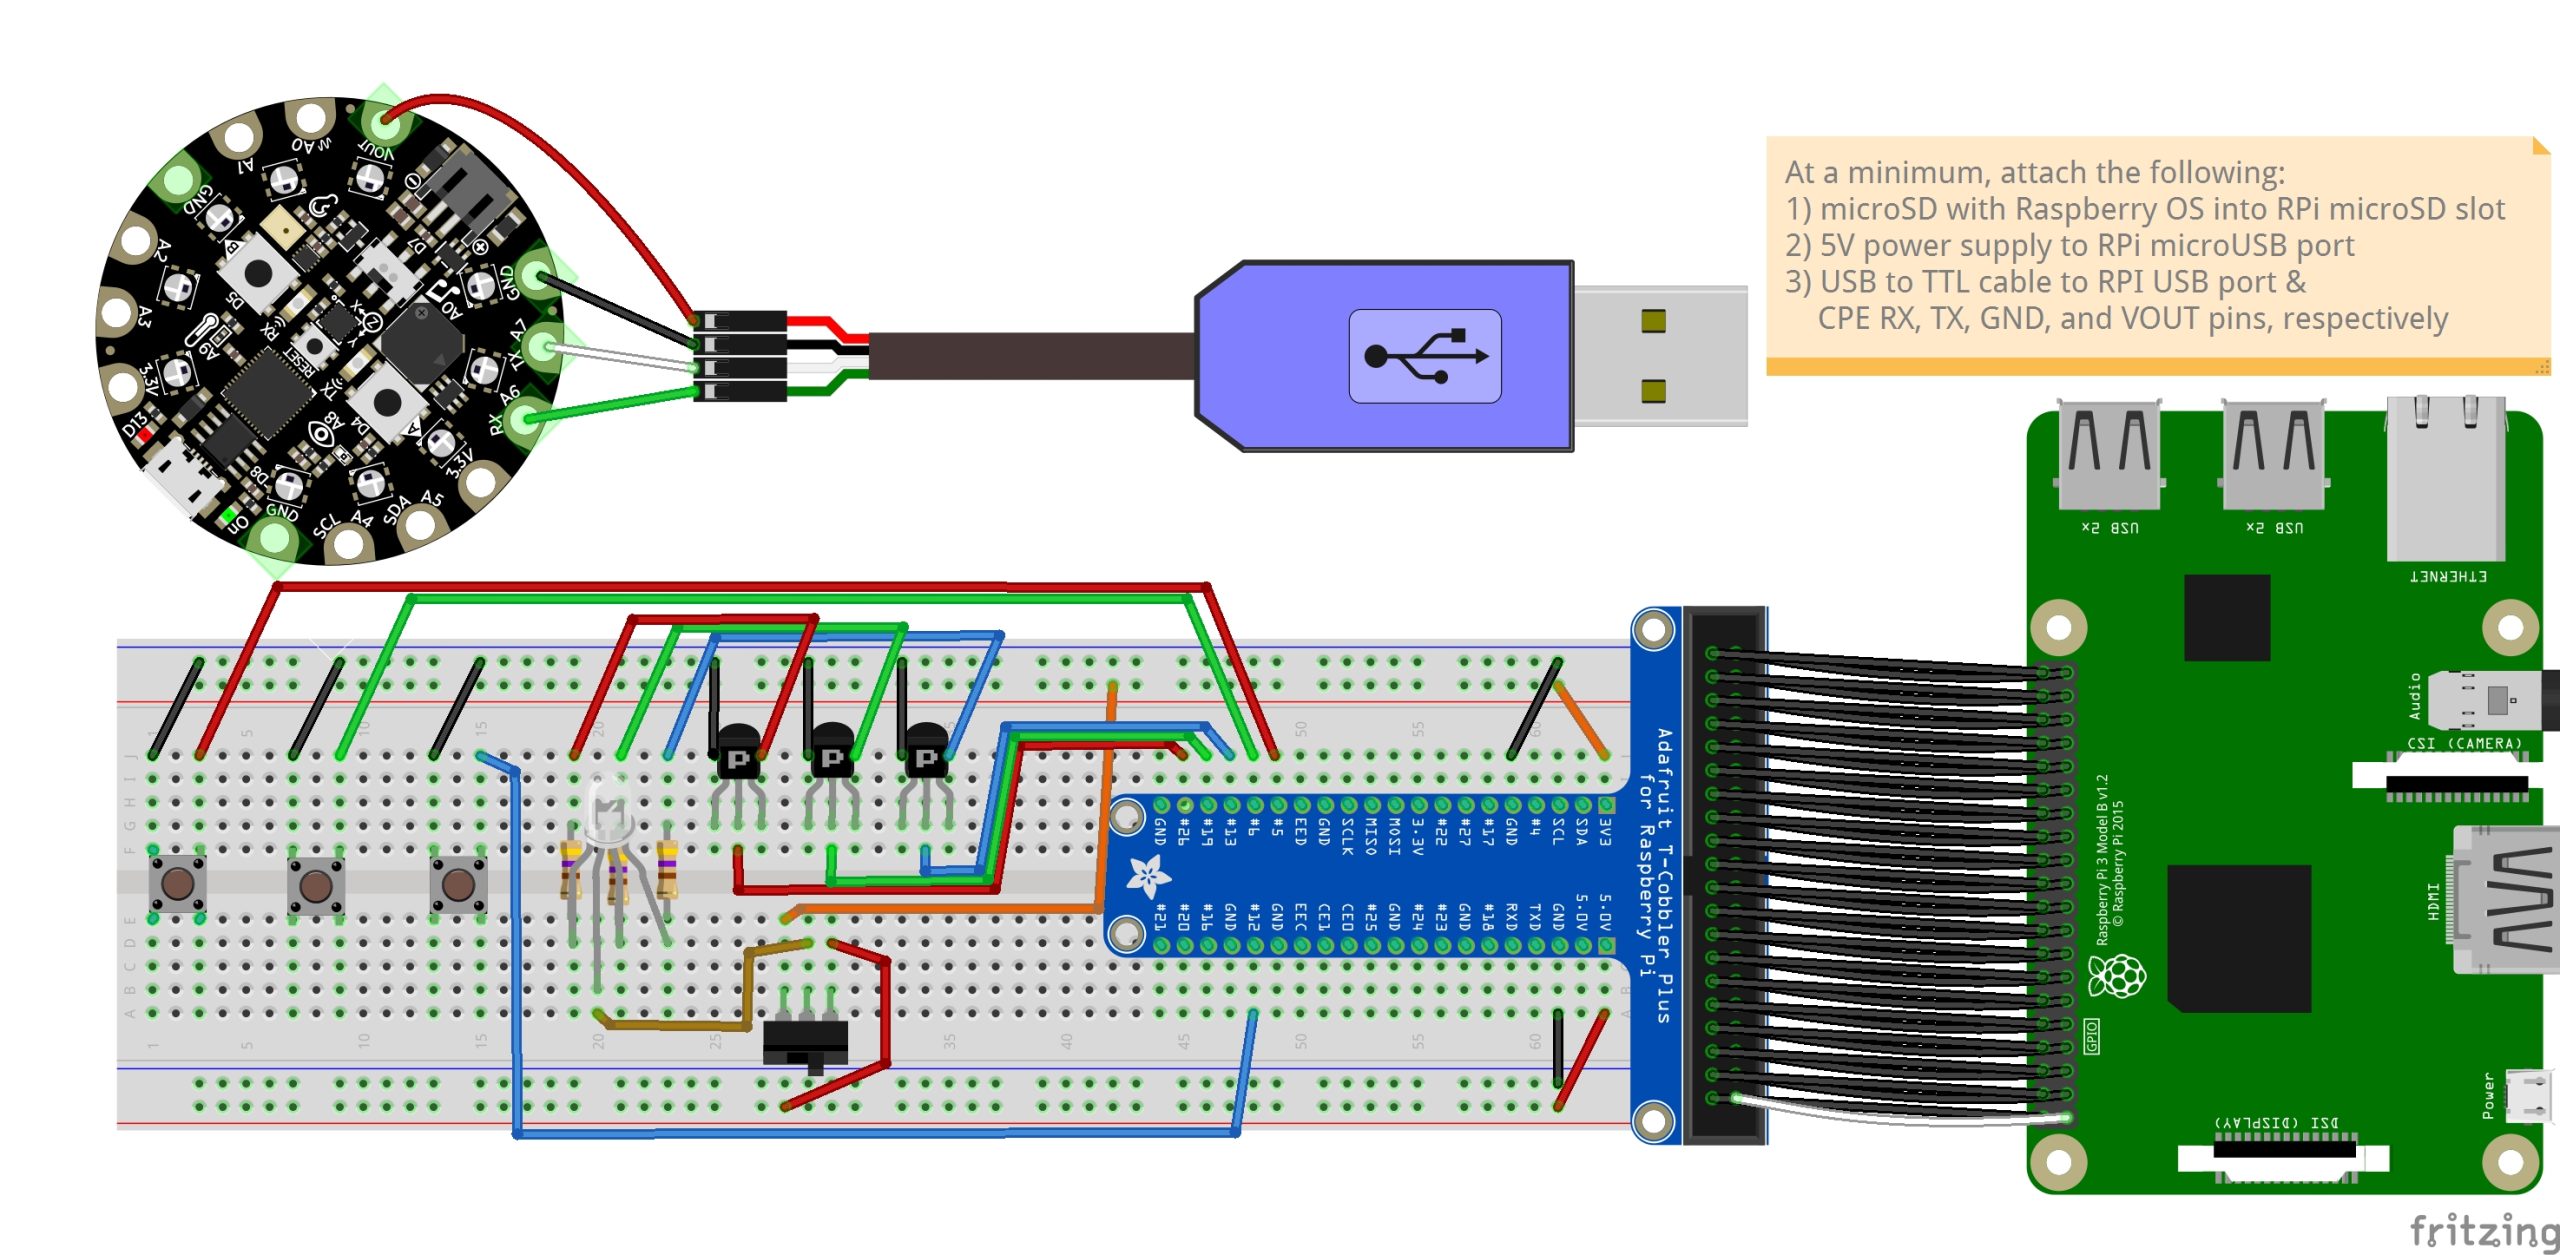
As we get started with these exercises, you may find it helpful to quickly review Blue Unit, Session 4, “Raspberry Pi Counterstory Little Free Library.” In particular, make sure you have your Circuit Playground Express connected to your Raspberry Pi using a TTL/USB Serial Cable. The TTL connects to the Circuit Playground Express using male to alligator clip wires. Disconnect the red wire from power (VOUT) on the Circuit Playground Express as we’ll be connecting the Circuit Playground Express to your personal computer with a microUSB to USB cable to edit the Circuit Playground Express code for these exercises.
If you haven’t been using the Raspberry Pi since the end of the Orange Unit, it might be helpful to review Orange Unit 4B: Meet the Microcomputer, including videos found within the chapter, and Exercises found in Orange Unit 4C: Getting Started with the Raspberry Pi.
- If you need help using RealVNC (Virtual Network Computing) on your laptop to serve as the keyboard, mouse, and monitor interface with the Raspberry Pi, review the later steps in the Exercise: First Boot of the Raspberry Pi OS
- If you are now connected to a different Local Area Network (LAN), you’ll need to connect the Raspberry Pi to a keyboard, mouse, and monitor temporarily to get it to connect to that network. If you have problems getting the monitor to serve as a screen for the Raspberry Pi in this new location, you’ll find FAIL FORWARD Tips in the Exercise: First Boot of the Raspberry Pi OS
- If you need help using the PiOLED to identify the IP address so that you can reconnect the VNC View on your laptop to the VNC server on your Raspberry Pi, review Exercise: Adding an Adafruit PiOLED Text Display
Opportunity to Remix
These activities do not use databases or machine-learning code to create that true IoT device. Further, while both the Circuit Playground Express and Raspberry Pi devices are configured to transmit (TX) and receive (RX) data via the Universal Asynchronous Receive Transmit (UART) protocol, MakeCode currently does not support the RX pads on the Circuit Playground Express. For those wanting to do a deeper dive, follow Adafruit’s tutorial to use CircuitPython on the Circuit Playground Express, instead of MakeCode, to effectively use both the TX and RX pads and create a full serial bi-directional communications with the Raspberry Pi. Note: If you want to return to working in MakeCode after using CircuitPython, Adafruit provides instructions for uninstalling CircuitPython.
Exercise: Using Python to Monitor Sensor Information
Let’s return to the circuitplayground-ToolboxTrumpet4Octave-WithUART.uf2 MakeCode[1] used within Blue Unit chapter 4B: Raspberry Pi Counterstory Little Free Library. We can reuse that code, remixing it slightly to re-purpose the “serial write” so that it outputs sensor data. We’ll test out this modification using a new Python program instead of the previous cstories.py.
Here’s where we’re beginning:
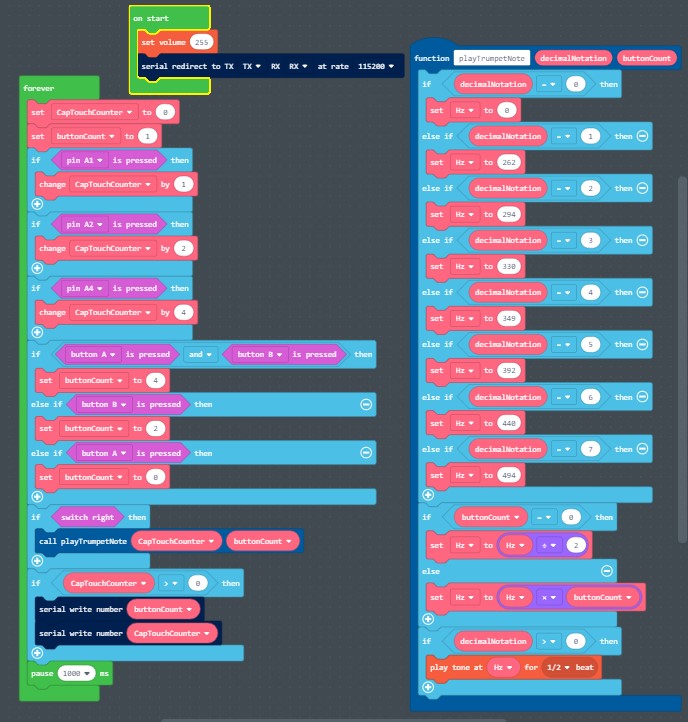
- Within the FOREVER loop, delete the “if CapTouchCounter > 0” LOGIC statement. This should also delete the two serial write number blocks within the if statement. Deleting this conditional “If…Then” logic statement is needed as we’ll want to transmit the serial write values whether or not the pads A1, A2, or A4 on the Circuit Playground Express have been touched.
- Add five new “serial write value “x” = 0″ blocks just above the “pause 1000 ms” block. These should be set up as follows. NOTE: value names are case sensitive as this will need to match the Python code run on the Raspberry Pi.
- ‘serial write value “Temp”‘ should be setup to transmit the INPUT “temperature.” It can be left as °C or changed to °F if you prefer Fahrenheit over Celsius.
- ‘serial write value “Light”‘ should be setup to transmit the INPUT “light level.”
- ‘serial write value “Runtime”‘ should be setup to transmit the CONTROL “millis (ms),” that is, the number of milliseconds elapsed since power on.
- ‘serial write value “Note”‘ should be setup to transmit the VARIABLE “CapTouchCounter.”
- ‘serial write value “Button”‘ should be setup to transmit the VARIABLE “buttonCount.”
- NOTE: Previously we transmitted a number. These are sent in 1-byte packets (1 byte = 8 bits). These numbers, which were in the range of 0-4 and 0-7, were predictably sent as a single 1-byte packet. Moving forward, values such as Runtime will range, requiring 1 or more byte-sized packets. In MakeCode, the easiest alternative is to send each as a complete line of data that ends with a carriage return and line feed. In this way, they can easily be displayed line by line in a console window, just as if you were typing in the data using a keyboard and then hitting the “Enter” key at the end of each line of data. Your lines should now look something like this. Note the two new sensor icons within the simulator window:
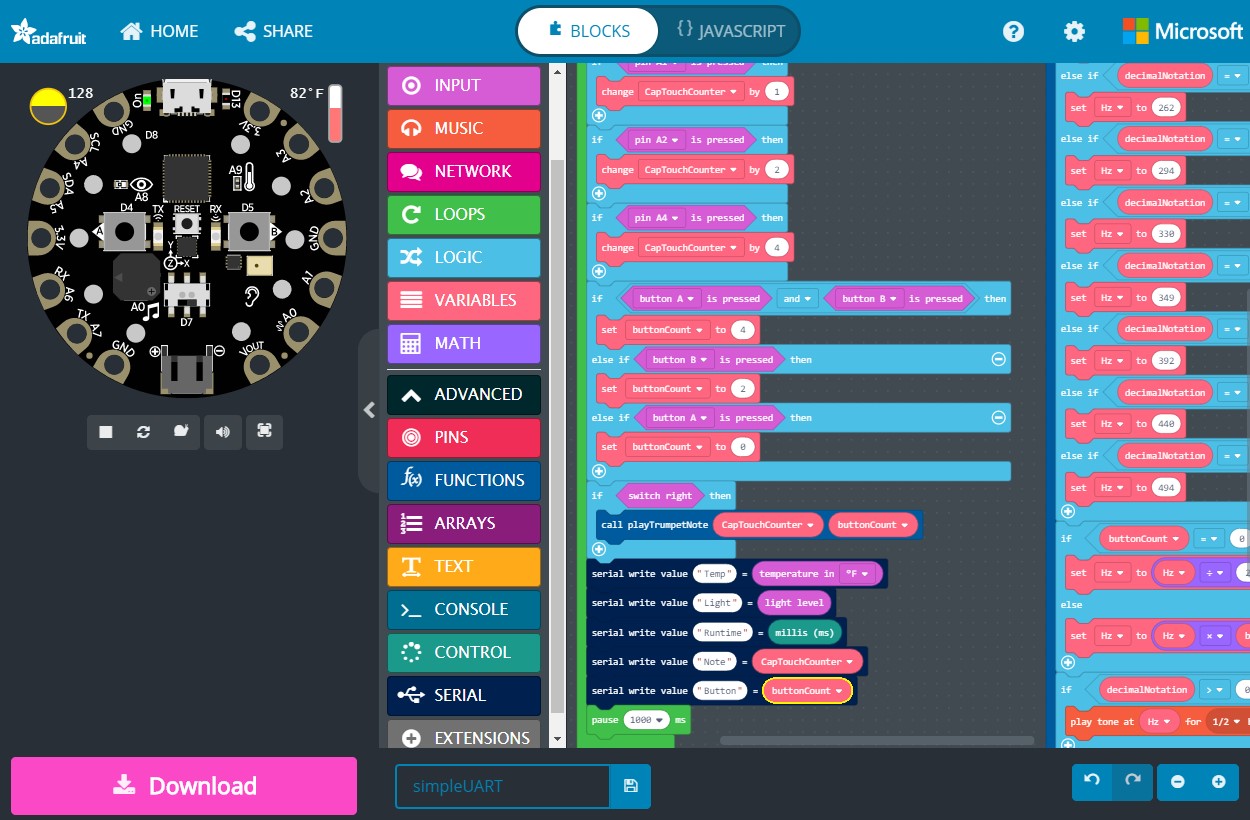
- Change the name of the file to SimpleUART, hit the save icon, and then flash this to your Circuit Playground Express.
- With the slide switch on the Circuit Playground Express to the right, you should be able to again play four octaves of the ‘C’ scale. Slide it to the left if you do not want it to play the scales moving forward.
- With the Circuit Playground Express now running the new code, disconnect the USB cable between the CPE and your laptop or Raspberry Pi. You’ll instead connect your Circuit Playground Express to the Raspberry Pi using the USB to TTL cable. Connect the black to ground, red to VOUT, white to TX, and green to RX.
- From a web browser, enter: https://go.illinois.edu/simple_uart5.
- Take a glance at this new Python code called simple_uart5.py:
- This code first imports some needed Python library packages accessed through the Python Package Index[2], including:
- serial, used to receive and transmit serial data
- os, which will let us to run Linux commands and read data
- sleep, which lets us run the time function
- RPi.GPIO, the PyPI project specifically for the Raspberry Pi GPIO.
- The code creates a variable called
uartand connects it to the/dev/ttyUSB0device. If you needed to change the USB port used for the Blue Unit Toolbox Trumpet Counterstory Player, keep this in mind. You’ll need to make that change again after downloading this file. - A key addition is a new function,
convert, that is created to change the Runtime from milliseconds to hours, minutes, and seconds. - The last half is a “while True” FOREVER loop that reads in the five lines each time they are sent from the Circuit Playground Express. It fine tunes each of the lines to make them more readable and then prints them to standard out, which typically is a terminal window display of the Raspberry Pi.
- NOTE: An essential piece of the fine tuning is related to the “decode” process. In particular, the Circuit Playground Express sends lines of data encoded using . According to Wikipedia, “Unicode Transformation Format 8-bit is a variable-width encoding that can represent every character in the Unicode character set. It was designed for backward compatibility with ASCII and to avoid the complications of endianness and byte order marks in UTF-16 and UTF-32.”[3] is the American Standard Code for Information Interchange. It was the standard for US-based computers and the basic encoding scheme initially within the Internet Protocol. However, this limited usable character sets, something that plagues much of global Internet usage to this day.[4]
- This code first imports some needed Python library packages accessed through the Python Package Index[2], including:
- Right click on the
simple_uart5programming code and save it assimple_uart5.pyto your personal computer (if connecting to the Raspberry Pi using a screen, PuTTY, or SSH) or to your Raspberry Pi (if using a keyboard, monitor, and mouse with the Raspberry Pi). Make sure to save it as a Python file with the .py extension, not with the default .txt extension.- If the
simple_uart5.pyfile was saved to your personal computer, copy it over to your Raspberry Pi using the scp command. - If you have more than one USB device connected to your Raspberry Pi, you may need to edit the Python code using nano, to match the /dev/ttyUSB0 line to your exact USB.
- If the
- In a Raspberry Pi terminal window, type in:

pi@raspberrypi:~$ python3 simple_uart5.py
Once the program begins, you will see new sensor information printed to the terminal window every second. Try pressing different sensors and buttons to see the data output change. You can end the Python session at any time by hitting CTRL-C. The display will look something like this:
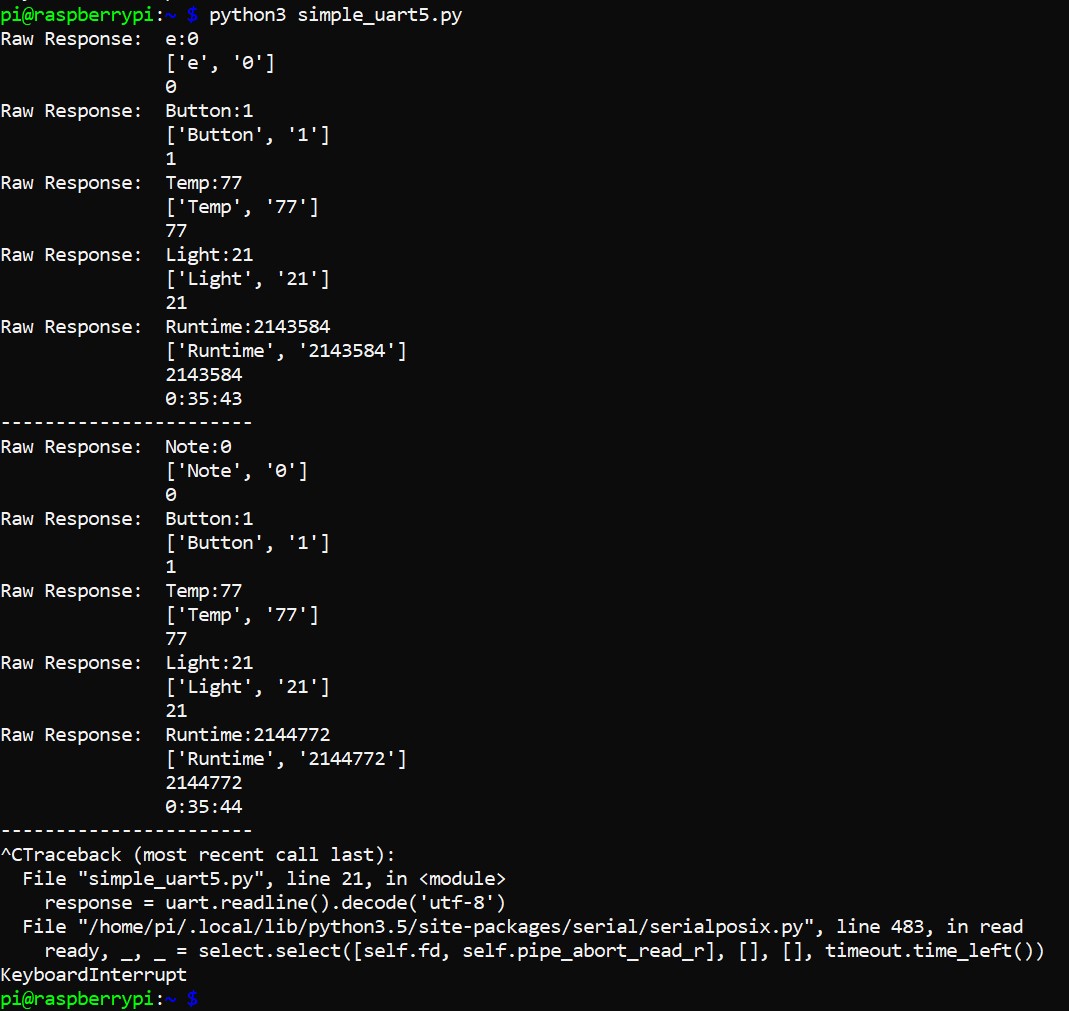
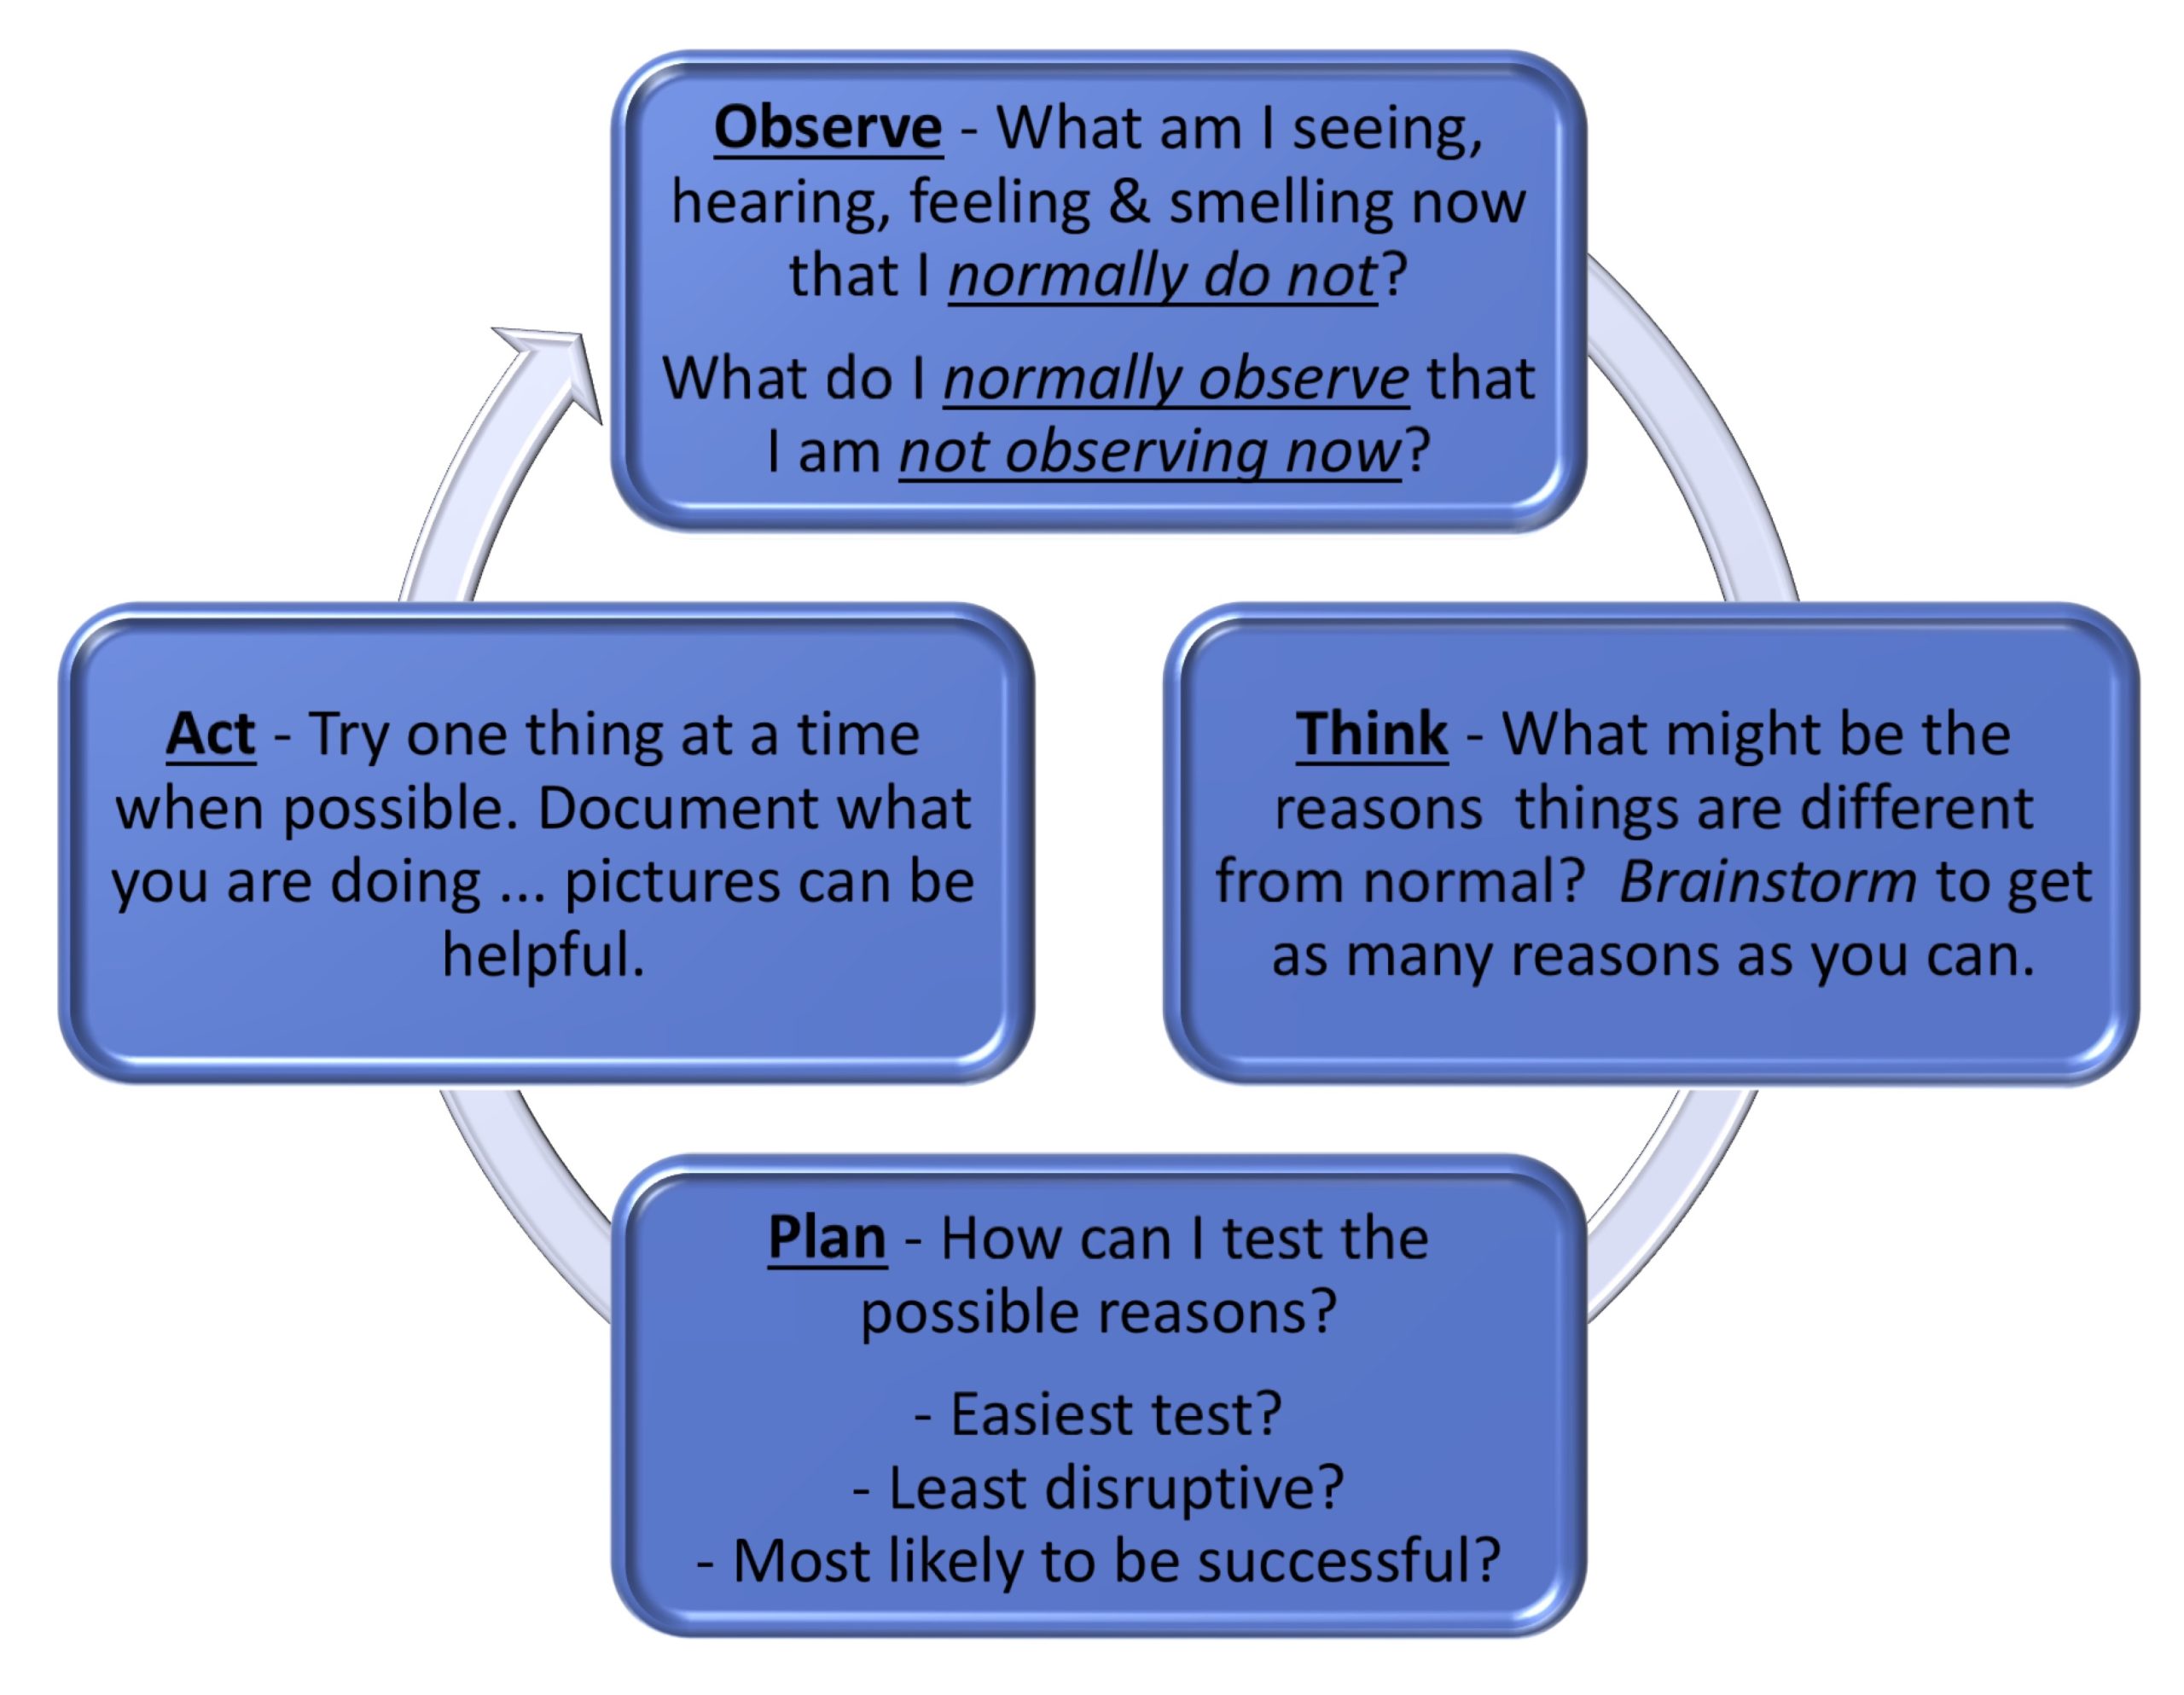
This may take some pair programming and failing forward to get up and running. Remember to work through the troubleshooting basics cycle to work from “not yet” to “yet”!
Key Takeaways
Microcontrollers are common in many of our everyday electronics, from computers to printers to microwaves to cars. Sometimes they only serve to sense device context and then control the motors running a device accordingly. Other times, sensor data is collected and passed on to other microcontrollers and to microcomputers. And sometimes microcontrollers collect data from other sensors first. The Circuit Playground Express has been designed first as an educational tool, but as we’ve seen first building the Toolbox Trumpet Counterstory Player and now in this exercise, it has a range of sensor capabilities that could be used as datasets informing actions for a range of information services.
What might you do next to remix this?
So far we’ve used the terminal window to view Python information. But since Python version 3, it is also possible to print this information as Hypertext Transfer Protocol (HTTP) server data instead of, or in addition to, a standard output like we’ve now sent to the terminal window. With the Python code and UART communications confirmed, let’s explore how this data can be made remotely available.
The Hypertext Transfer Protocol is a well-established, highly used TCP/IP-based client/server protocol that we’ll explore more formally in Rainbow Unit, Session 2. For now, consider that you make regular use of web browsers which perform a client role putting forward requests to associated servers using the same protocol. Today, web browsers are mostly used to access pages stored on HTTP servers by typing in an http:// or https://, followed by an Internet Protocol name associated with that server, and perhaps further subdirectory names on that server, each separated by another ‘/’ symbol, and finally the resource name at the end of the last ‘/’ symbol if needed. Together this creates a . The URL is a commonly used form of the more general Uniform Resource Indicator (URI), strings of characters used to unambiguously identify a particular resource. The first part of the URL states the protocol to be used. Web browsers actually support a number of different protocols, but we almost always make use of the HTTP protocol or the secure Hypertext Transfer Protocol, HTTPS. For the following exercises, the remainder of the http:// URL will include the Raspberry Pi’s IP address and a special port number we’ll define in the Python code to separate it from any other web servers that may be running on your local network.
Exercise: Using http to Remotely Monitor Sensor Information
For this exercise, we do not need to change anything on the Circuit Playground Express or with the TTL/USB cable connection to the Raspberry Pi. The focus instead is on the Raspberry Pi IP Address and the Python code that will be used to read the five lines of serial data sent once every second by the Circuit Playground Express using the TTL/USB cable.
- From a web browser, enter: https://go.illinois.edu/simple_uartWebserverCPE.
- Take a glance at this new Python code called simple_uartWebserverCPE.py. This is pretty complex, and do not worry if it doesn’t make much sense at this time. Notes have been added, delineated using the comment character “#”. Doing a quick read of these comments might be helpful to just highlight key aspects of the Python code. Later, after running this Python code on the Raspberry Pi and then reading data through a web browser, come back and review it again.
- Right click on the
simple_uartWebserverCPE.pyprogramming code, and save it assimple_uartWebserverCPE.pyto your personal computer (if connecting to the Raspberry Pi using a screen, PuTTY, or SSH) or to your Raspberry Pi (if using a keyboard, monitor, and mouse with the Raspberry Pi). Make sure it is not saved with a final .txt extension. - This code will now need to be edited using a simple text editor on your laptop, or using Thonny or mousepad on the Raspberry Pi:
pi@raspberrypi:~ $ mousepad /home/pi/Code/Python/simple_uartWebserverCPE.py
Whichever text editor you use, here are the changes that need to be made:- In the third section at the top of the code, note that the host_name is configured to the IP address assigned to my home Raspberry Pi (more on connecting your Raspberry Pi to a Local Area Network (LAN) is provided in the backmatter of this textbook). The host_name variable will need to be changed after downloading the Python code to match the IP address you find when typing into the Raspberry Pi terminal window the following:
pi@raspberrypi:~$ hostname -I
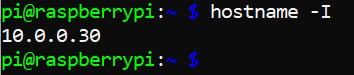
Also included in this section is a host_port. Think of a shipping port of call as an analogy. When arriving at a shoreline with designated docking ports for a boat or ship, a set of names or numbers are used. This is the same for the Internet Protocol. By default, HTTP uses port 80 and HTTPS uses port 443. Ports from 0 through 1023 are well-known system ports and are stricter than ports above this range. Port 8080 is actually a common number used for test web servers. The iSchool course for which this textbook is commonly used is IS401, and so 8401 is the chosen host_port listed here. But this can be changed, and indeed should be changed if the same Raspberry Pi is attempting to run multiple different web servers simultaneously.
- If you have more than one USB device connected to your Raspberry Pi, you may now also need to revise the /dev/ttyUSB0 line to an appropriate USB device other than 0.
- Save the changes to the Python code.
- If
simple_uartWebserverCPE.pywas edited using mousepad on the Raspberry Pi, save the file and exit mousepad. - If
simple_uartWebserverCPE.pywas edited using the Thonny Python IDE on the Raspberry Pi, save the changes. You can then use the Run icon at the top of Thonny to test out the code. - If
simple_uartWebserverCPE.pywas edited on your personal computer, copy it over to your Raspberry Pi next.
- If
- With the Python code tweaked to match your IP address and possibly your
/dev/ttypUSBassignment, type the following in a Raspberry Pi terminal window:
pi@raspberrypi:~$ python3 simple_uartWebserverCPE.py
- In a web browser located on the same local network as your Raspberry Pi, type in your Raspberry Pi’s IP address, followed by
:8401, like this:
http://10.0.0.30:8401
This is the most complex piece of programming code we’ve worked with yet. It includes changes needed within Python to match it with the IP address of your Raspberry Pi. For some, this may be the first time you’ve edited Python. You may have been using the Raspberry Pi in Graphical User Interface mode with a keyboard, mouse, and monitor; and thus it might be the first time you’ve had to work with the IP address of the Raspberry Pi.
In addition, many new concepts related to networking are just starting to be introduced. In all, there are plenty of “fail forward” opportunities to advance a growth mindset. Maybe too many for the time being, in which case “yet enough” might be working collaboratively with another person to walk one of you through this exercise on one Raspberry Pi.
But I would encourage you to spend at least 45 minutes or so working to fail forward on each Raspberry Pi available, comparing and contrasting what works and what doesn’t work as a community of practice.
simple_uartWebserverCPE.py code:- In addition to several other Python libraries, the code imports the http.server module of the base Hypertext Transfer Protocol, or HTTP, request handler and server library package.
- The core part of the Python code is the class BaseHTTPRequestHandler. In Python, “classes provide a means of bundling data and functionality together.”[5] BaseHTTPRequestHandler “is used to handle the HTTP requests that arrive at the server. By itself, it cannot respond to any actual HTTP requests; it must be subclassed to handle each request method (e.g. GET or POST).”[6]
- In this case, do_HEAD() sends the headers for a typical GET request sent from a HTTP client such as your web browser, including a 200 OK response and a content type ‘text/html’ noting text and/or is being sent back to the client.
- The do_GET() does the lion’s share of the work setting up a dynamic HTML page. It can do this because a special implementation of BaseHTTPRequestHandler is being used for reading data from and controlling GPIO of a Raspberry Pi—note the Import RPi.GPIO at the top of the file.
- At the bottom of the do_GET() function, you’ll note a wfile.write statement, written in the stated html.format, encoded in UTF-8. Within the html.format portion of this statement, there are seven items providing data to be integrated into the seven {} tags above, in order from top to bottom. So the “temp” data is collected using the vcgencmd—that is, the Raspberry Pi VideoCore GPU command line utility. The five Circuit Playground Express data items are read next through the USB to TTL serial port, and finally an empty status line, something currently unused.
- The last lines of the Python code are the location where the server hangs out waiting for client requests before going into action with the class BaseHTTPRequestHandler code.
- The html text within the code includes a statement:
<meta http-equiv="refresh" content="1">.
Many web browsers know what this statement means and are set up by default to follow this meta statement to refresh the content with a new request to the server every second. The terminal window will note who placed the request for information, when the request was placed, and the do_HEAD response provided, while the web server will show the do_GET response provided, as shown below: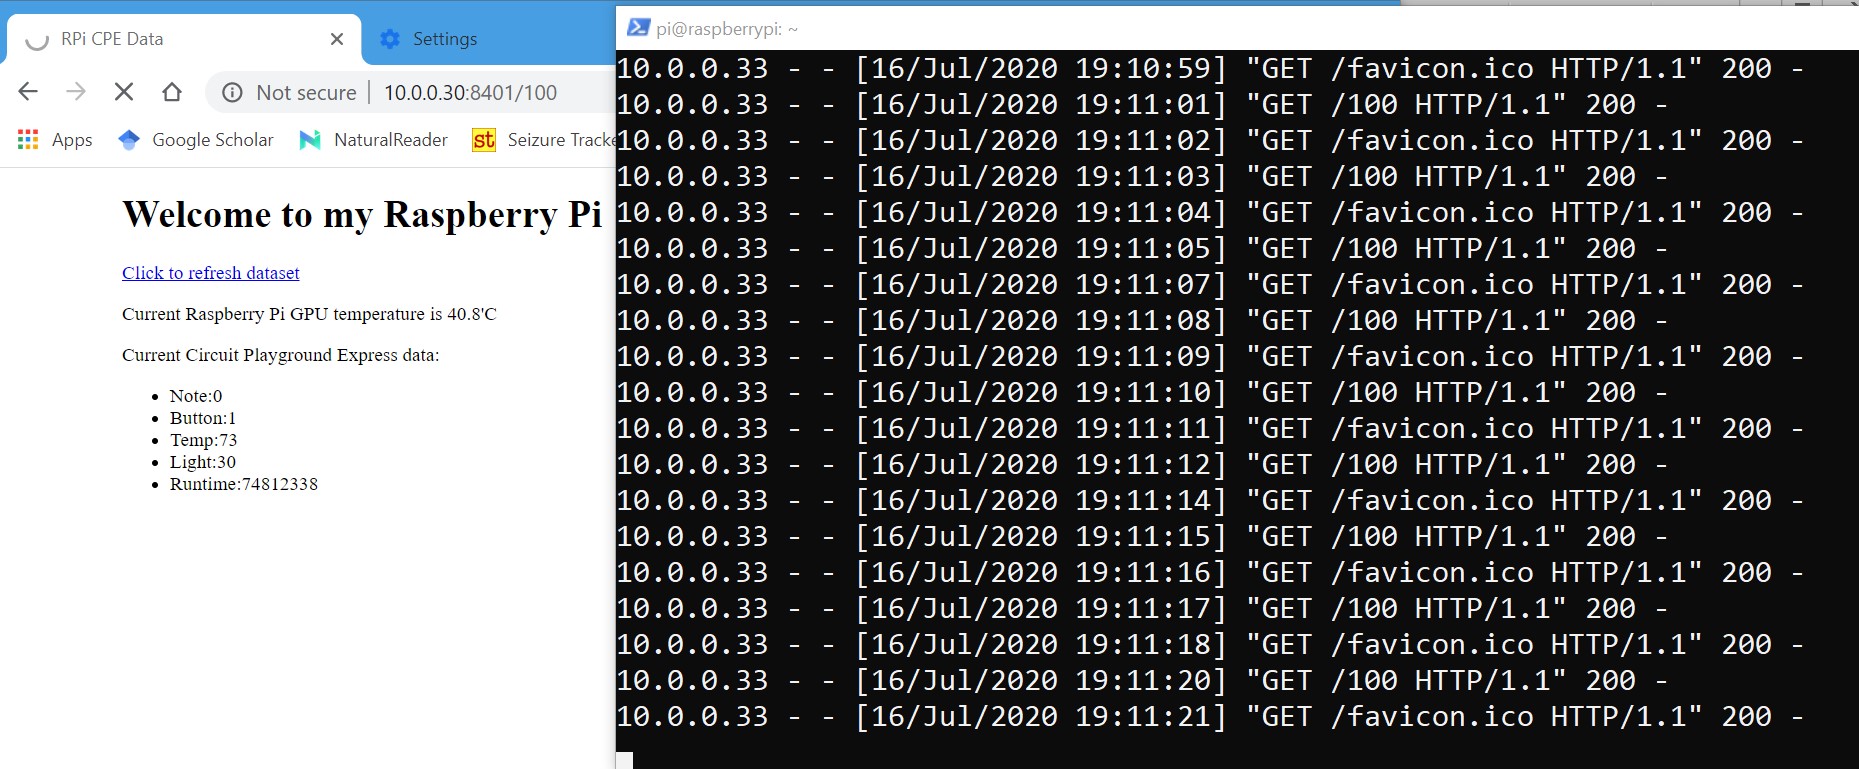 A link stating “Click here to refresh dataset” and javascript refresh script is also provided in the HTML to facilitate manual refreshes of the data, in case a web browser does not follow the meta instructions.

Key Takeaways
The Hypertext Transfer Protocol (HTTP) is a widely used client/server protocol. For most, you’ll encounter the HTTP application as a general-purpose server—a common one being Apache—in which many different parent and child web pages are located through websites located on a single web server. This textbook in its online version is a gathering of many individual web pages located on one of those general-purpose servers. There are other Illinois Open Publishing Network “Windsor & Downs Press” books, and also a number of “Publishing Without Walls” books and “IOPN Journals” all located on this general purpose web server.
In this exercise, though, we’re running a special-purpose, Python-based HTTP server on a microcomputer and we are setting it up for the specific purpose of distributing data it collects both from its own hardware and data provided over a serial connect from a microcontroller—all gathered within the Python program to share as a single web page. But as is the case with the majority of HTTP-provided data, it is sent using the Hypertext Markup Language (HTML), the standard for web pages.[7] An important takeaway is the distinction between HTML standard and the HTTP protocol. Both are Internet Protocol-based. But while standards serve as guidelines that can or should be followed, protocols serve as rules defining exactly how data is exchanged and the expected behavior to be followed within this change. You can put anything into an HTML page that you want, and it will be sent to the requester—whatever is in there. But if it is something outside of the standard, it may be ignored or even lead to distorted communication between the client and the server using this protocol.
Within an object-oriented programming language, a collection of data variables are acted upon using defined functions that are brought together as an object. A class then serves as the blueprint for that object. In this exercise, the class BaseHTTPRequestHandler brought together two functions, do_HEAD and do_GET, each beginning with the Python function keyword “def”. The do_GET() method, or function, implements the standard GET method of HTTP/1.1 used to retrieve whatever information is identified by the Request-URI. The do_HEAD() method, on the other hand, MUST NOT return a message-body but rather the metainformation continued in the HTTP headers. This is different from the <head></head> of the HTML standard, which is instead meta-information as defined within the HTTP protocol.
For more, take a look first at the formal protocol definitions page. This was the original document used by W3C, the World Wide Web Consortium based on sections from RFC9110 and which was referenced in the first edition of this textbook, published in 2020. Subsequently, in June, 2022, the Internet Engineering Task Force (IETF) published RFC 9110, HTTP Semantics. This now supersedes the W3C document and the better source to learn more about the semantics used in the above paragraph. The IETF and the process are formally introduced in Rainbow Unit 2A: Digital Internets Past and Present.
Currently MakeCode on the Circuit Playground Express only supports the writing of data using one of the serial write blocks, thereby providing data to the other side of the UART connection. It does not support the serial read blocks. Otherwise, we could enter the data into variables and use those, for instance, to set LED pixels to specified colors. But think back to the Orange Unit’s Coding Electronics chapter where we used the Python command switchLED.py to read the three momentary switch push buttons and turn on or off associated LEDs via transistors for each of the three parallel circuits.
Exercise: Using HTTP to Remotely Control LEDs
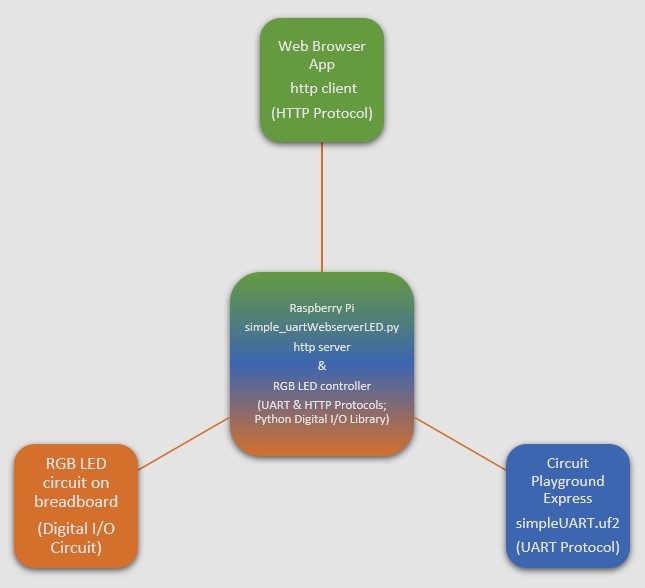
As we enter this last exercise, let’s consider how we might make use of the Python class BaseHTTPRequestHandler on the Raspberry Pi to not only provide regularly updated Circuit Playground Express data, but also information regarding which LED is currently running on the breadboard based on the status of the Momentary Switch push buttons just reviewed above. While this will bring together two “things” on one Raspberry Pi, this also provides a potential launchpad for considering ways different microcontrollers and microcomputers could ultimately further be brought together to create a range of local “Internet of Things” devices.
def do_GET from which a selection can be made regarding which of the three LEDs should be on, and which should be off. And below that, additional variables have been set up to read from, and write to, the appropriate GPIO pins.- From a web browser, enter: https://go.illinois.edu/simple_uartWebserverLED
- As before, take a quick glance at this new Python code called simple_uartWebserverLED.py. Much of it is taken directly from the simple_uartWebserverCPE.py program. And as before, after downloading this, you will need to edit the Python file to change the “host_name” from 10.0.0.30, the local IP Address of my Raspberry Pi at my home office, to be whatever IP address you were assigned on your local network. The file is much longer, though, because of the new HTML table and then the new series of “If…Then…Else” conditionals, one to provide an edited output of the Circuit Playground Express data, the other to interact with the GPIO pins and edit associated variables.
- Right click on the simple_uartWebserverLED.py programming code and save it as simple_uartWebserverLED.py to your personal computer (if connecting to the Raspberry Pi using a screen, PuTTY, or SSH) or to your Raspberry Pi (if using a keyboard, monitor, and mouse with the Raspberry Pi). Make sure it is not saved with a final .txt extension.
- This code will now need to be edited using:
- Thonny Python IDE, in which case you can test the code through the Thonny Run icon, or
- using mousepad on the Raspberry Pi
pi@raspberrypi:~$ mousepad /home/pi/Code/Python/simple_uartWebserverLED.py
- Whichever text editor you use, here are the changes that need to be made:
- ALL: Change the host_name to match the IP address assigned to your Raspberry Pi as seen in the hostname command, or as used to ssh into your Raspberry Pi.
- If you have more than one USB device connected to your Raspberry Pi, you may now need also revise the /dev/ttyUSB0 line to an appropriate USB device other than 0.
- ALL: save the changes you just made.
- Before going to the next step, be sure other Python programs we’ve been running are stopped. This includes:
simple_uartWebserverCPE.pyused in the previous exercise is not still running as it is already using the assigned port number for its own HTTP server.
-
switchLED.pywhich you might have run in the Key Takeaways of the last exercise.- To stop a program running on the Linux command line, you typically will type:
pi@raspberrypi:~$ CTRL-C
Where CTRL- indicates for you to press and hold down the control key on your keyboard while typing in the additional key, which in this case is the letter ‘c’.
- With the simple_uartWebserverLED.py Python code tweaked to match your IP address and possibly your
/dev/ttypUSBassignment, in a second Raspberry Pi terminal window, type in:
pi@raspberrypi:~$ python3 /home/pi/Code/Python/simple_uartWebserverLED.py
- In a web browser located on the same local network as your Raspberry Pi, type in:
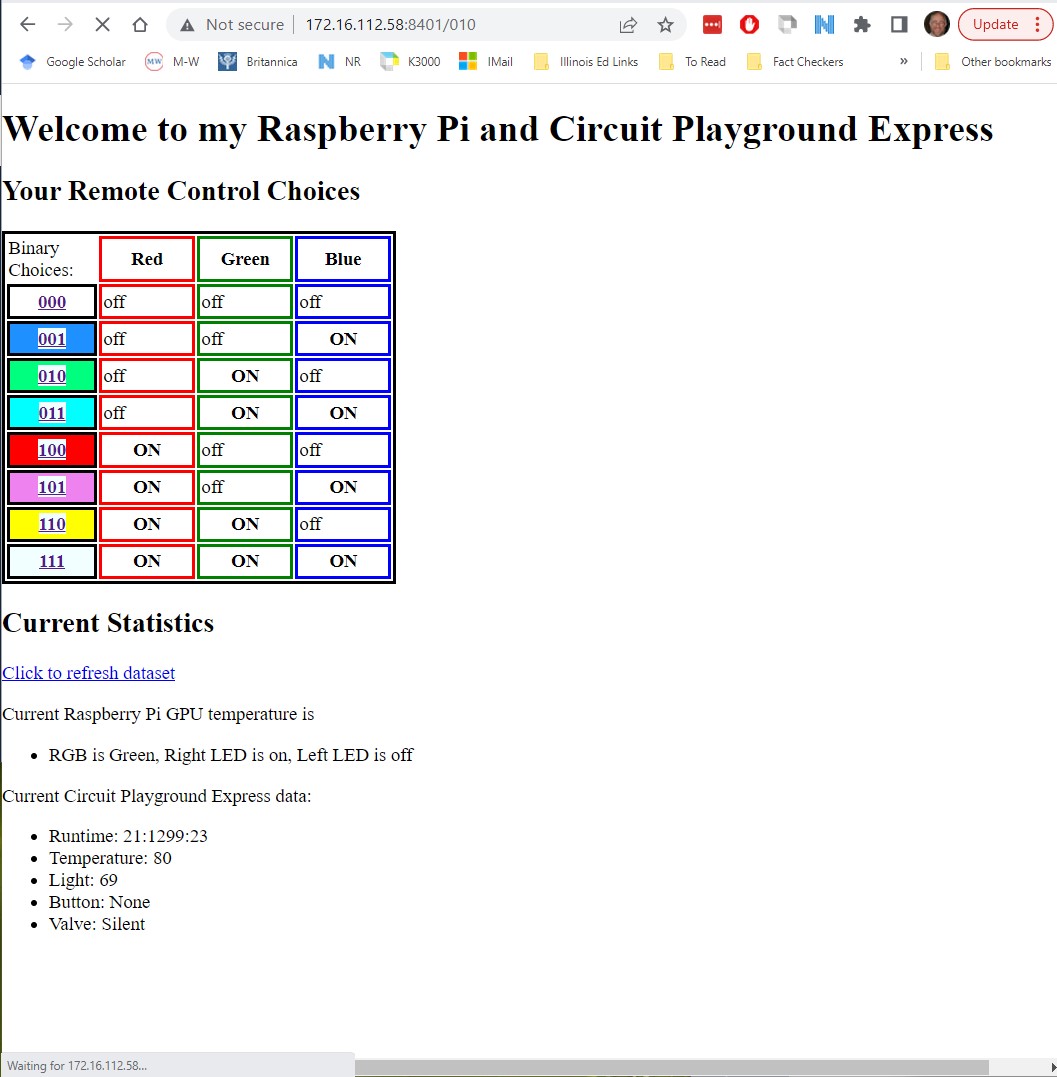
http://172.16.112.58:8401Again, replace the IP address above with your Raspberry Pi’s. As you can see, this example is on a different LAN from the previous examples.
You should now see something like the following:
Key Takeaways
In this exercise, we have revisited an exercise from the Orange Unit in which Python code was used to create a programmable circuit allowing us to selectively turn on and off LEDs using Momentary Switch push buttons. We have continued to use a MakeCode Toolbox Trumpet program on the Circuit Playground Express, which allows us to play four octaves of the C-Scale. And, finally, we expanded the Python code from the previous exercise to both report on data from the Circuit Playground Express and also from the Raspberry Pi GPIO, and also add in the ability to remotely control another red, green, and blue LED set.
Pause to look again at the two images taken to display the target outcome of this exercise. Now that these are set up and working properly, consider the following probe questions:
- How many different devices are now playing a role as tools within this third exercise?
- How many different computer programs are now playing a role facilitating the use of these tools?
- Which tools could be used independent of the other tools shown in the images? Which ones must be used together to work? Which ones cannot work fully independently, but could be used through slight adjustments, for instance, by just being provided a separate power source?
- Which ones now require access to the Internet periodically, or continuously, to function effectively? Consider the Internet not as the local network, even though it works using the Internet Protocol, but rather the connection to the global Internet provided by your Internet Service Provider.
- Are there times when you see discrepancies in the timeline of information collected vs. displayed? Which components might be shaping these discrepancies, if any?
- Who shaped the different tools, including the electronics and computer programs used to create these tools? How does this shaping go on to shape your use of them?
Wrap Up
As we’ve worked through Session One, we’ve worked to demystify what it means when someone says a thing is an Internet of Things, or Smart device. We’ve worked to unpack what is actually within these devices, and also what is essential for them to work together. The goal is for this to help us to see that IoT devices can often stand separately and work independently. But as they are brought together on a local network, the data can start being combined to further influence the monitoring and activity of these interrelated devices. Also, as we’ve seen here, a local microcomputer can be set up to collect the data from multiple other datasets separately collected on devices and consolidated into a single output.
From here, consider that both the Raspberry Pi and Circuit Playground Express themselves can collect data from multiple worker devices as a parent using the I2C serial data transmission protocol. When Circuit Playground Express is programmed using Python or Arduino, this could include both input and output data with a range of remote microcontrollers and integrated circuit sensors and motors, with data being stored in a file instead of, or in addition to, sending it to the Raspberry Pi using the UART serial communications protocol. Likewise, the Raspberry Pi can both provide data dynamically to a web browser and also store this data in a file or database. And while our programs have been used to provide a consistent unconditioned stimulus and response pattern, it is possible that through the use of machine learning algorithms, this can be expanded to create conditionals to reshape stimulus and response patterns. All of this can readily be done without Internet connectivity using local networking technologies.
But it’s also important to note that there’s the Internet of Things and there’s the Bitnet of Things as differentiated by Neil Gershenfeld and his colleagues. If the Raspberry Pi serves exclusively or primarily as a storage center for data, this is more like a centralized Bitnet of Things. Even if this centralized system facilitates remote control of devices, it has not yet moved to being an Internet of Things device, especially if each microcontroller/microcomputer device with which it might communicate remains separate from all other devices within its arena.
As an example, I found it increasingly important to purchase a window air conditioner for our home woodshop given the rising nighttime temperatures, increased humidity, and the negative impacts this was having on the metal tools and wood used in our carpentry projects. This week I purchased a Toshiba Smart Wi-Fi Window Air Conditioner with Remote and ENERGY STAR. In setting it up, I was able to use the easy to use touch controls. What about some of the other methods for working with the air conditioner specified using the terms Smart, Wi-Fi, and Remote? Toshiba clarifies the Remote Control as a now standard radio frequency handheld remote used within the same room. The Wi-Fi, on the other hand, requires a connection to the Local Area Network, thereby facilitating communications with the associated smartphone app and with voice controlled using Amazon Skill. Toshiba has helpfully clarified that their use of the term smart indicates the air conditioner, like our remotely controlled LEDs, can interface with smartphones. And while the Amazon Alexa Skills system does incorporate machine learning and narrow artificial intelligence (AI for a specific task), these are not incorporated within the air conditioner to provide ongoing engineering of the auto settings.
This is the concept behind the Bitnet of Things for Neil Gershenfeld and others.

What might be the alternative pathway in which the air conditioner was integrated within an Internet of Things workshop? The table saw, bandsaw, planers, chop saw, woodlathe, air compressor, dust collector, and various other mechanical tools and also the wood resources would include sensors set up as Internet of Things devices. The dust collector, air compressor, and air conditioner would monitor the saws, planers, and lathes to detect usage and performance levels. These would be used to adjust settings on the climatic and air quality standards within the space to increase performance and longevity of machine, human, and more-than-human alike. In part, this would be done through integrated machine learning that worked not only individually on each of the many sensors and controllers, but through end-to-end strategic learning to recognize the best adjustments given the different contexts and current requirements. After all, the woodshop is a very different space when it is also being used to raise a new gathering of soon-to-lay-egg chicks, or when it is used by my students to design, cut, and build computer tables, or when it is used by my family to build gifts, sometimes in rapid succession.
This is the concept behind the Internet of Things. Machine learning moves from a centralized command and control to each of the various tools that now have as part of the construction electronic sensors, servomotors, and other controllers. These tools then work in an artificial community of practice to achieve objectives the algorithms on each individual device could not do alone.
It is not essential for there to be Internet access, although sometimes it might be useful for there to be. For instance, if we were to configure the home router, which is provided a public IP address, to forward port 8401 requests to the private IP address of the Raspberry Pi, then web browsers around the world could choose the LED color! If done in this way, the Internet is not needed to collect and analyze the data and adjust algorithms accordingly, but instead is used to provide additional data as helpful.
And there are times when it is helpful to send data to remote databases, HTTP servers, and other systems, either as the primary server array for storing and consolidating information, or as a secondary location in addition to the primary local server. This will be the focus of Session Two of the Rainbow Unit.
For now, this and the previous exercise provide baseline examples of the broader framework used for many Internet of Things devices. But it also provided some starting points that you could use to build your own Internet of Things devices right now. For those wanting to dig deeper into the technical work of building Internet of Things devices, you may want to watch further episodes in the series, including:
- Episode 3 on Services (Read the full video transcript on Adafruit’s website).
- Episode 4 on Adafruit IO, an Internet of Things Service by Adafruit for those starting out with IoT (Full transcript available on Adafruit’s website).
- Episode 5 on Security (transcript at Adafruit’s website).
Comprehension Check
- MakeCode © 2020 Microsoft and Adafruit. Screenshots used with permission. ↵
- Also known as PyPI, pronounced like “pie-pea-eye.” Despite the shared “PI,” it is not specifically Raspberry Pi-related. ↵
- “UTF-8” in Wikipedia, July 20, 2020, https://en.wikipedia.org/w/index.php?title=UTF-8. For more resources on UTF-8, see http://www.utf-8.com/. ↵
- Endianness defines the ordering of bytes of a word of digital data, with big-endian-based and little-endian-based computer architectures ordering bytes in storage in two significantly different ways. Today’s major personal computer providers use the little-endian format. ↵
- “9. Classes — Python 3.8.4 Documentation,” accessed July 20, 2020, https://docs.python.org/3/tutorial/classes.html. ↵
- “Http.Server — HTTP Servers — Python 3.8.4 Documentation,” accessed July 20, 2020, https://docs.python.org/3/library/http.server.html#module-http.server. ↵
- A tutorial for HTML is available from W3Schools.com. ↵
Universal Serial Bus (USB) is a formal industry standard with specifications for cables and connectors, and also protocols for connections, communication, and power supply between electronic devices such as computers and peripherals. USB 1.x, 2.0, 3.x, and the upcoming 4 are generations of the standard and associated specifications. The USB port connector on a device is called the receptacle, while the connector on the cable is called the plug. There is a range of different USB connectors approved within USB committee specifications, including:
Standard format USB Type-A (common on computers, and used on the Raspberry Pi) and Type-B connectors (seen in a range of removable devices, such as external hard drives and printers). Type-A receptacles on devices are color-coded white, indicating USB version 1 or 2 compliant low/full/high speed ports, or blue, indicating USB version 3.x SuperSpeed compliant ports.
Mini-A (common in cameras and some tablet computers) and Mini-B connectors.
Micro-A and Micro-B connectors, common in many mobile devices. For USB 3.x ports, a thin but wider Micro-B SuperSpeed plug is used.
USB-C is a formal connector specification, and does not necessarily implement USB 3.x standards.
Computers incorporate a range of audio/video interfaces, depending on vendor. Some of the most common interfaces currently in use include:
High-Definition Multimedia Interface (HDMI), a proprietary audio/video interface standard, currently at version 2.X. This is included as the display port on the Raspberry Pi Model 3 and Model 4 microcomputers.
DisplayPort (DP) is a VESA standard digital display interface, and is backward compatible with other interfaces such as HDMI. Apple computers use the Apple-designed Mini DisplayPort (mDP), although beginning in 2016, Apple began moving towards use of the USB-C connector.
Thunderbolt is the brand name of an interface standard developed by Intel and Apple. The standard allows the multiplex of individual data lanes from multiple connected devices to a single DisplayPort (DP), Mini DisplayPort (mDP) (Thunderbolt versions 1 and 2), or USB-C (Thunderbolt version 3) connector.
Pronounced "u-art," the universal asynchronous receiver-transmitter is a commonly used hardware supporting serial communication between two devices, such as between a microcomputer and a microcontroller. As an asynchronous device, UART data can be sent at different periods of time as needed. This contrasts with synchronous data communications technologies such as the dynamic random access memory (RAM) found in dual in-line memory modules (DIMM) of a computer, in which data is exchanged at precise intervals. "Universal" indicates the configurability of UART, allowing for unique code to be written supporting different data types and sizes to meet specific data communication needs. An independent driver circuit manages transmission levels (e.g., 115,200 kilobits per second speed) and methods (e.g., USB to TTL) used within a specific communication cable.
The ever-present application layer protocol used to request and access media (such as webpages) from across the Internet. Website URLs begin with “http” or “https” to signify this protocol (the added ‘s’ denotes the secured HTTP protocol, which is increasingly common). The Hypertext Transfer Protocol is part of the Internet protocol suite.
A language for creating, deleting, and manipulating data in a relational database. Although SQL is a standard language, many vendors, such as MySQL, have their own “dialect.” Relational database management systems are often a key component within the “client-server” architecture.
A computing structure in which individual devices can share information and resources directly without relying on a dedicated central server. Each device can perform a mix of resource provision (e.g., computation, storage, and networked sharing) and resource requesting (e.g., web page, new email or social media posts) tasks. Compare to client-server architecture, in which the client device performs requests while a server device performs resource provision.
Used together with the Internet Protocol (IP), UDP is an alternative to TCP when speed is essential and error-correction is not. For example, live video streaming applications use the UDP protocol, acknowledging that video may occasionally freeze or appear jumpy for brief periods.
Together with the Internet Protocol (IP), TCP is one of the primary protocols of the Internet protocol suite. TCP specifically defines how data intended to be sent over a network is broken into packets before transmission and reliably reassembled in the right order at the destination application. Many applications, including the web, email, and file transfer, rely on TCP as a foundation.
A key communications protocol for routing data within networks, thus enabling the Internet. This protocol delivers packets from a sender to the destination and requires IP addresses for routing these packets. Domain Name Server (DNS) services are used to associate IP names with specific IP addresses.
UTF-8, the 8-bit Unicode Transformation Format encoding system, is the dominant encoding for the World Wide Web. It is backward compatible with ASCII, but provides support for a wide range of languages beyond American Standard encoding of ASCII.
The American Standard Code for Information Interchange (ASCII) uses 7 binary 0s and 1s (bits) to represent characters. The first 32 characters (00000000 to 00011111) are unprintable control codes. Codes 32-127 (00100000 to 01111111) are printable American English codes, including everything seen in this glossary term definition.
Also known as a web address, the URL is a commonly used form of the more general Uniform Resource Indicator (URI), strings of characters used to unambiguously identify a resource, such as “https://www.wikipedia.org.” The first part of the URL states the protocol to be used. While web browsers support several different protocols, we almost always make use of the HTTP protocol or the secure Hypertext Transfer Protocol, HTTPS.
The standard markup language for data, structured into documents, intended to be displayed on a web browser. Using a standard syntax, HTML annotates a document with a semantic structure. For example, wrapping a phrase in <em></em> HTML tags denotes that those words are italicized when rendered in the web browser.
RFCs are technical and organizational notes about the Internet and cover many aspects of computer networking, including protocols, procedures, programs, and concepts.
