Take a few minutes to bring up a mental picture of each musical instrument you’ve played yourself, or which you’ve watched others play.
How are they played? What similarities and differences are there across instruments?
How might they be constructed? What materials are used? How does material choice influence use of, and sound creation by, the instrument?
Of the instruments considered, which ones might make use of digital technologies? Of programming languages?
So far, we’ve used the Circuit Playground Express microcontroller and MakeCode programming language to learn essential coding concepts.[1] In particular, we’ve explored:
Conditional logic
Iteration loops
Variables
Modularization
Technical Introduction
We’ve also started exploring how we can write programming code using these concepts to interact with analog and digital electronic circuits in order to develop working electronic tools.Now, let’s turn our attention to the tools that might facilitate our telling of counterstories. We’ve seen how different folks are creating collective digital stories in community-based co-design projects using emergent approaches.[2][3] A Little Free Library is one of many examples in which analog information sharing takes place to advance community building. Let’s consider if the Circuit Playground Express microcontroller and Raspberry Pi microcomputer can work together to serve as a digital extension to an existing analog Little Free Library in a community. In what ways can digital networked information systems serve as tools to help advance the analog? In what ways might it disrupt the analog? In what ways is the disruption good? In what ways is it harmful? Rather than considering how the digital replaces the technical, perhaps a digital little free library can be a valuable tool — a digital networked information system extension — for the already existing analog networked information systems sharing information and knowledge in communities, with communities, and for communities. We will create a Little Free Library tool using the Circuit Playground Express and the Raspberry Pi for archiving and selective playback of stories. Down the line we will hopefully be able to use touch sensors to indicate which story is to be shared.But first, let’s put the system through some early testing by turning the components into a Toolbox Trumpet!
Piano Keys and Trumpet Valves
Let’s compare a piano to a trumpet. With a piano, you have a key for every note you want to play. For instance, if we want to play the basic C major scale in ascending order, we’d need seven keys as follows:
| C | D | E | F | G | A | B |
In music, an octave is a series of eight notes that take you from the first note back to that note, but in which that note is now twice or half the frequency of vibration that it was before.
To go down one octave, we’d need another set of seven keys to the left that cut the frequency of vibration in half. If we wanted to go up an octave, we’d need seven keys to the right that double the frequency of vibration. So to play three octaves of the C scale, we’d have something like:
| C | D | E | F | G | A | B | C | D | E | F | G | A | B | C | D | E | F | G | A | B |
Compare this to a trumpet. The standard trumpet has three valves. Each valve is a cylinder that, when pressed down fully, moves the airflow from one set of tubing to a different set of tubing. The airflow now takes a different path from the mouthpiece where it enters the trumpet to the bell where it exits the trumpet. In so doing, it changes the frequency of vibration slightly, changing the note being played.
To play a scale, you need to press one, two, or three of those valves, or none of the valves, depending on the note you are wanting to play. To make this work, you need to add in embouchure. A person playing the trumpet uses their lips and facial muscles to adjust the frequency of vibration up and down, thereby slowly moving up or down scales and octaves in combination with the movement of the valves.
In this case, we’d play a middle-C scale like so:
Note
Valve 1
Valve 2
Valve 3
C
open
open
open
D
pressed
open
pressed
E
pressed
pressed
open
F
pressed
open
open
G
open
open
open
A
pressed
pressed
open
B
open
pressed
open
Exercise: First Three Notes
Choose Your Own Adventure
In the introduction to the book, I shared about the tulip poplar, a wood which inspires me, and which I have used to craft a toolbox for my Raspberry Pi equipment. As visible in the video below, I’ve attached nylon conductive tape to the lid of the toolbox. The benefit of completing the exercise in this way is that it extends the digital capacitive touch sensors into an analog parallel. If you’d like to follow along in a similar manner, two resources are available to you:
But this is not the only way forward. The following exercises can be completed exclusively with the Circuit Playground Express. To pursue this remix, jump ahead to Option 2: Circuit Playground Express Trumpet.
Option 1: Toolbox Trumpet
Let’s do some experimenting to find out how we might play notes on our Toolbox Trumpet by using three nylon electrically conductive tape strips on the cover of our toolboxes, and then using alligator clips to connect each to a pin on the Circuit Playground Express.
Before going through this and the following exercises, take 4 1/2 minutes to watch this video demonstration of the Toolbox Trumpet:
Connect three alligator clip wires between the nylon conductive tape pieces and the Circuit Playground Express:
Connect one end of an alligator clip wire to the nylon conductive tape by the single | column. Connect the other end of that alligator clip wire to pin A1 on the Circuit Playground Express.
Connect one end of a second alligator clip wire to the nylon conductive tape by the double | column. Connect the other end of this second alligator clip wire to pin A2 on the Circuit Playground Express.
Connect one end of a third alligator clip wire to the nylon conductive tape by the quad | column. Connect the other end of this third alligator clip wire to pin A4 on the Circuit Playground Express.
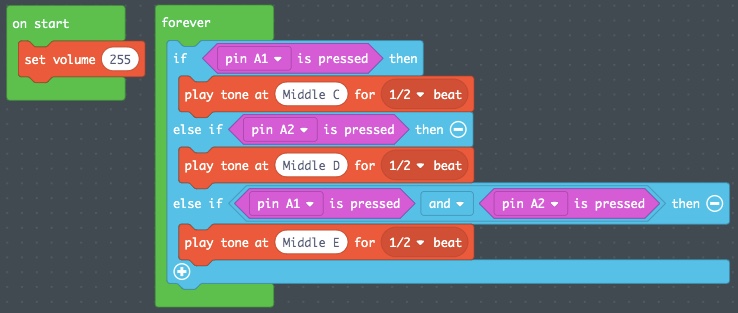
Next, we’ll follow the steps to develop the code for playing a Middle C.
Option 2: Circuit Playground Express Trumpet
We can also make a trumpet with the capacitive touch sensors on the Circuit Playground Express. On the microcontroller, identify the sensors labeled A1, A2, and A4.
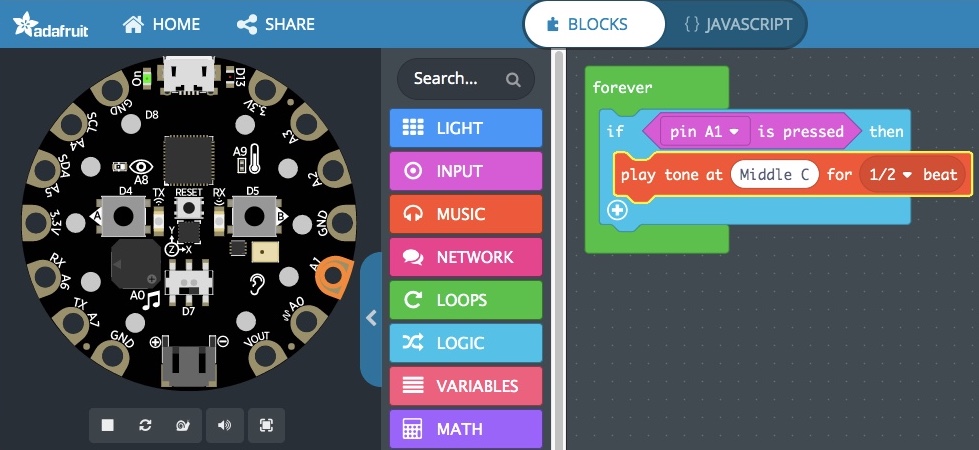
To a , add in an block from the “Conditionals” section of the LOGIC category.
From the INPUT category, take a “button A is pressed” block statement, and drop it into the “If…Then” block statement where it currently says <True>.
Hit the “button A ∇” window and change that to “pin A1.” It should now say “if pin A1 is pressed, then.”
From the MUSIC category, take the “play tone at Middle C for 1/2 beat,” and put it below the “if pin A1 is pressed, then” statement.
In the simulator, move the mouse pointer over to the A1 pin and press down to play a Middle C for as long as you press it. We’re playing our first note!
Let’s test it out on the real Circuit Playground Express:
Save your project as MiddleCTest1.
Flash this to your physical Circuit Playground Express.
Press A1 on the Circuit Playground Express.
In this first test, the sound was a little soft. Let’s crank up the volume a bit and test again.
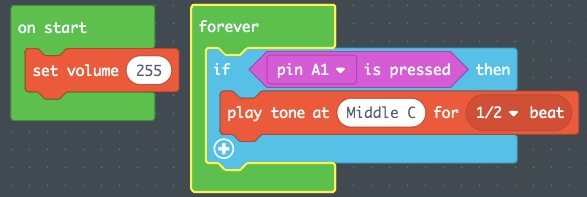
From the LOOPS category, pull out an “on start” loop.
Add to this new loop a “set volume” from the MUSIC category.
For testing, let’s set that to 255, the largest number listed.
Save this as MiddleCTest2.
Flash this to your physical Circuit Playground Express.
Press A1 on the Circuit Playground Express.
Feel encouraged to continuing adjusting this to meet your preferences.
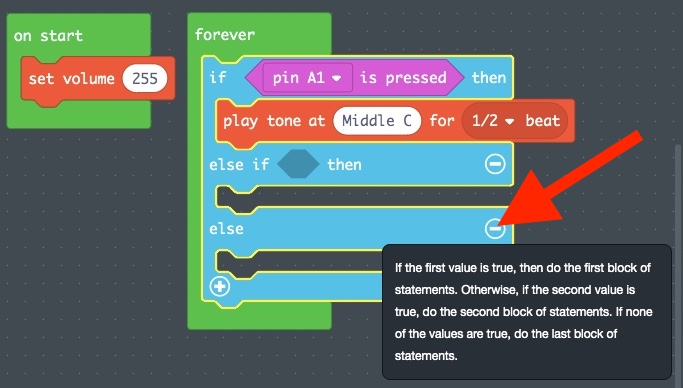
Next, let’s add the ability to play a Middle D. We’ll do this in an else “If…Then” block statement right below the Middle C “If…Then” block statement.
Click on the + symbol at the lower left of the current “If…Then” block statement. This creates an else statement.
Click on the + symbol again to add an else “If…Then” block.
Hit the – symbol to the right of the else statement to remove it.
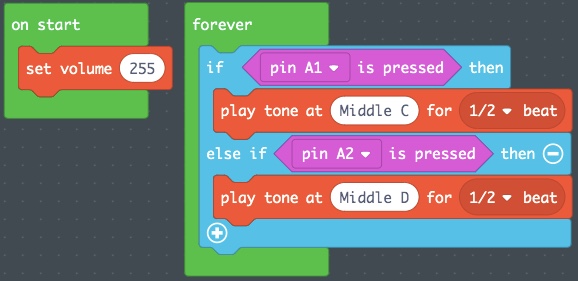
Duplicate the “pin A1 is pressed” block input statement and place that in the new else “If…Then” block statement. Change it to pin A2.
Duplicate the “play tone at Middle C for 1/2 beat” statement, place it under the “else if <pin A2 is pressed> then” statement, and change it to Middle D.
In the simulator, move the mouse pointer over to the A2 pin and press down to play a Middle D for as long as you press it. We’re ready to start our way up the C scale!
You might want to do a quick test on the physical Circuit Playground Express by saving the file and flashing it over. We’re in a process of rapid design and prototyping, so for now, if it works, we can move on. But do be sure to take notes of what is working subpar based on your as self-assessment, and your understanding of preferences if this were to be made available to other users.
With these two notes playing adequately, now what? We’ve only got three “valves” and we want to play seven different notes. Remember that on a real trumpet we could press 0, 1, 2, or 3 valves. We could also use embouchure to create more possible combinations. To mimic the trumpet, we are using only three buttons or “valves.” Is it possible that we can press these in combination to play a third note? Let’s test this out by pressing both pin A1 and pin A2.
Hit the + symbol at the bottom of the “If…Then…Else If…Then” conditional statement twice to add in a third “Else If…Then” block statement below the “pin A2 is pressed” conditional.
Delete the “Else” at the bottom of this extended “If…Then” control flow statement block of conditionals.
Go into the LOGIC category and scroll down to the “Boolean” section. From there, grab a “< > and < >” statement and add this to the third “If…Then” block statement.
Copy the “pin A1 is pressed,” and place that into the left “< >” space.
Copy the “pin A2 is pressed,” and place that into the right “< >” space.
Copy the “play tone at Middle D for 1/2 beat,” and drop it below the “else if <<pin A1 is pressed> and <pin A2 is pressed>> then” statement, and change it to Middle E. You should see something like this in the MakeCode programming screen.
Unless you have a touch screen, you cannot test this in the simulator. So let’s continue testing on our physical Circuit Playground Express.
Let’s name this ToolboxTrumpet3Notes and click on the save icon.
Flash this new downloaded file to your physical Circuit Playground Express.
Now we are ready to test our Toolbox Trumpet prototype.
Option 1: Toolbox Trumpet
Option 2: Circuit Playground Express Trumpet
Result
Press the single | column nylon conductive tape.
Press the A1 CPE sensor.
You should now hear a Middle C.
Press the double | column nylon conductive tape.
Press the A2 CPE sensor.
You should hear a Middle D.
Press both the single | and double | column nylon conductive tapes simultaneously.
Press the A1 and A2 CPE sensors simultaneously.
You should hear that Middle E!
We’ve reached three notes! …Or did we?
Boolean Logic
In the code we just wrote, we created three “If…Then” block logic statements inside the forever loop. Logical true and false, yes and no, 1 and 0 propositions are the fundamental process used in both electronics and modern programming languages, as well as in statistics and positivist paradigms of research.
, or Boolean algebra, uses two possible values, “true” and “false,” to test logic statements. This concept was introduced by George Boole in his books The Mathematical Analysis of Logic (1847) and An Investigation of the Laws of Thought (1854). The Boolean logic written in our first code was as follows:
Is pin A1 pressed?
True →
Play Middle C for 1/2 beat →
End
False
↓
Is pin A2 pressed?
True →
Play Middle D for 1/2 beat →
End
False
↓
Is pin A1 and A2 pressed?
True →
Play Middle E for 1/2 beat →
End
False
↓
End
Note that the order of True/False statements in Boolean logic is essential. If pin A1 is pressed, then play Middle C. Else, if pin A2 is pressed, then play Middle D. Else, if both pin A1 and pin A2 are pressed, play Middle E.
This makes perfect sense if our ultimate goal is to move up the C scale, going from the Middle C on to the Middle D and then the Middle E.
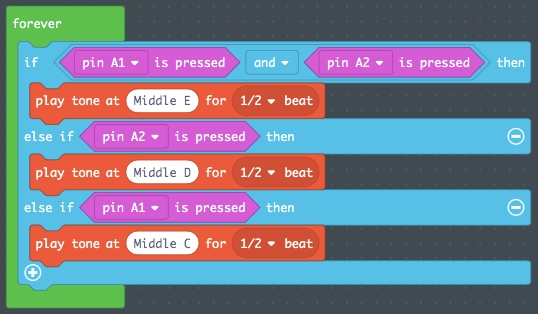
The problem is, code uses Boolean logic, which has already determined that neither pin A1 nor pin A2 was pressed, so logically we already know both are also not pressed. That means we need to reverse our test in a way that fits within formal Boolean logic. In so doing, we should be in better shape.
Is pin A1 and A2 pressed?
True →
Play Middle E for 1/2 beat →
End
False
↓
Is pin A2 pressed?
True →
Play Middle D for 1/2 beat →
End
False
↓
Is pin A1 pressed?
True →
Play Middle C for 1/2 beat →
End
False
↓
End
For more on Boolean logic, take 10 minutes to watch this video on “Boolean Logic & Logic Gates” from the Crash Course Computer Science series featuring Carrie Anne Philbin, hosted by PBS Digital Studios:
Exercise: Toolbox Trumpet, First Three Notes, Failing Forward
Open the MakeCode project named ToolboxTrumpet3Notes, and swap the “If…Then” block statements around using our Boolean logic diagram above. Your code should now look like this:
Save and Download this edited version of the MakeCode, calling it ToolboxTrumpet3Notes-FailForward.
Hit “reset” on the Circuit Playground Express microcontroller, and then drag and drop the ToolboxTrumpet3Notes-FailForward.uf2 file into the CPLAYBOOT device.
Press the toolbox’s single | or CPE’s A1 “valve” and you should now hear a Middle C.
Press the toolbox’s double | or CPE’s A2 “valve” and you should hear a Middle D.
Press the toolbox’s single and double | or CPE’s A1 and A2 “valves” together. You should hear that Middle E!
This time it should play the first three notes of a Middle C scale!
Key Takeaways
Failing forward to move from Not Yet to Yet is an unavoidable part of the creative process.
The human experience incorporates multiple ways of knowing and being. But for many of us, using true/false statements is not a part of our everyday practice.
While in the last session we worked to expand our essential coding concepts like , , , and , it is only with the incorporation of Boolean logic that we gain some of the central deductive reasoning skills needed to effectively put our designs into executable code.
Boolean Logic and Algebraic Notation
Reflecting back on our Toolbox Trumpet code, let’s step aside for a minute to consider ways we could get three “valves” to play seven different notes.
We could have set up that third else “If…Then” block statement to play Middle E with the third valve alone. What might have been the design choice to instead play it using the first two valves combined?
What would be the next valve or valve combinations of to play the next note in the C scale, a Middle F?
Base Ten Decimal Notation
Count with me from zero to nine using decimal notation:
Zero
0
One
1
Two
2
Three
3
Four
4
Five
5
Six
6
Seven
7
Eight
8
Nine
9
Excellent!
Now, what would we do if we wanted to move to the number ten?
If you kept a close eye, you’ll notice the table above had a couple of blank columns to the left of the column listing numbers 0 to 9. Let’s use that as a means to count from zero to twenty.
Zero
0
0
One
0
1
Two
0
2
Three
0
3
Four
0
4
Five
0
5
Six
0
6
Seven
0
7
Eight
0
8
Nine
0
9
Ten
1
0
Eleven
1
1
Twelve
1
2
Thirteen
1
3
Fourteen
1
4
Fifteen
1
5
Sixteen
1
6
Seventeen
1
7
Eighteen
1
8
Nineteen
1
9
Twenty
2
0
Note that now we’ve had a “tens” column all along. The value was just at zero when we started. Once we moved over to ten, we reset the “ones” column to zero, and moved the “tens” column to one.
The “tens” column remained at 1 while we moved the “ones” column from 1 to 9. To take the next step, we moved the “ones” column back to 0, and the “tens” column from 1 to 2, giving us twenty.
Using just these two columns, we could make our way up to ninety-nine. Now, let’s move from ninety-nine to one hundred. To do that, we need to use the third column, that is, the “one hundreds” column:
Zero
0
0
0
…
Nine
0
0
9
Ten
0
1
0
…
Ninety-nine
0
9
9
One Hundred
1
0
0
One Hundred and One
1
0
1
…
One Hundred and Ninety-nine
1
9
9
Two Hundred
2
0
0
Two Hundred and One
2
0
1
…
Two Hundred and Ninety-nine
2
9
9
Three Hundred
3
0
0
…
Nine Hundred and Ninety-nine
9
9
9
To go any further in base ten, we’d need a fourth column, that is, the “one thousands” column, which we don’t have in the table we’ve been using for this. We’re at our limit.
When Base Ten Decimal Notation Isn’t the Best Option
So if we somehow could do a lot of real quick tapping on those valves, we could be moving quite lively through a whole bunch of different notes. Our voices can move steadily through notes by adjusting the frequency with which they vibrate. The problem is, when we use the valve of a trumpet or our prototyped equivalent, it serves as a means to accomplish Boolean logic.
If the trumpet valve is pressed, move the airflow through this tube. Else, pass it through that tube.
If our prototyped valve is pressed, that is, if pin A2 is pressed, play a Middle D.
As a matter of fact, in MakeCode, when you click to change the note you were wanting to play if pin A2 is pressed, clicking on the Middle D of the visual piano also shows the number 294, or 294 Hertz. Hertz is the frequency, or number of cycles per second that something should cycle up and down. The slower it cycles, the lower the pitch. The faster it cycles, the higher the pitch.
Middle C is actually specifying that the little speaker on the Circuit Playground Express cycle 262 times per second, or 262 Hz, while Middle D cycles at 294 times per second, or 294 Hz. By cycling a little faster, the pitch is a little higher.
With a standard speaker, that means a membrane vibrates up and down 262 times per second or 294 times per second, depending on if we’re playing a Middle C, or a Middle D, respectively. This is what makes an analog sound. And it’s the same thing that human vocal cords do.
collect and distribute data using the digits 0 and 1 to serve as samples of the analog signals or information. Pins A1, A2, A3, A4, A5, A6, and A7 on the Circuit Playground Express can serve multiple roles, one of which is as . When performing these readings of skin or other materials that have a slight positive charge, the input level is interpreted as a binary value of 1 and a logic value of True. When no positively charged touch is sensed, the input level is low, and a binary value of 0 and logic value of False are used.
In MakeCode, the word “pressed” in the statement “if pin A1 is pressed, then” is equivalent to the binary value 1 and the logic value True.
are made up of continuously variable physical quantities. The speaker built into the Circuit Playground Express delivers an analog signal. The frequency of oscillation from peak to peak in a sine curve as shown below determines the musical pitch we hear. The note heard in a speaker vibrating two full oscillations, as shown in red in the image below, is 1/7th the pitch of the note played in the speaker when there are 14 full oscillations as shown in purple in the image below.
If the sine wave below showing 14 full oscillations represents 262 Hertz, that is, a frequency of 262 oscillations per second, then the one above, showing 7 full oscillations in the same time period represents 131 Hertz. As seen in the MakeCode “Play tone at” line, 262 Hertz is a Middle C, while 131 Hertz is a Low C. The human ear can hear sounds as low as 20 Hertz, and in the image below 2 full oscillations in this time period is equivalent to about 37 Hertz given the other two frequency calculations, although it may be that the Circuit Playground Express will not play a frequency that low.
Image by LucasVB, Wikimedia Commons, dedicated to the public domain.
We could work to press our “valve” 262 times a second to play a Middle C over the next second in time. Or we could give ourselves some liberty and adjust the clocked such that if we tapped it 26 times in 10 seconds, we would play a Middle C scale over the next second of time.
Probably a more practical way forward is to use the conductive touch sensor pins on the Circuit Playground Express. We can take the digital inputs on these sensors and use basic Boolean logic to identify which of these sensors is touched during the current clock cycle. Then we can calculate a mathematical conversion to a certain frequency, say 262 Hz, to provide an analog Middle C output via the Circuit Playground Express speaker.
Building from here, we could design and construct a toolbox piano made from tulip poplar, much like in the first video of this session. But that would require 21 nylon conductive tape pads, placed close enough together to let us easily switch between them, but far enough apart that we don’t sense a current flow between them, confusing the code. Current can conduct over wood, especially when moist from rain or from just the wear of our moist human hands on the wood and nylon. Doable? Yes. Practical? Perhaps not.
Is there another design option?
Base Two Binary Notation
It’s exactly this conundrum that moved early developers of electronics and the early computers from base ten decimal notation to base two . Binary works in zeros and ones only. That is, they are a standard means of implementing Boolean logic!
Is pin A1 and A2 pressed?
True →
Play Middle E for 1/2 beat
False
↓
Is pin A2 pressed?
True →
Play Middle D for 1/2 beat
False
↓
Is pin A1 pressed?
True →
Play Middle C for 1/2 beat
Or let’s revisit the electronics studied earlier in the book: The push button itself is a Boolean logic processor.
Is the momentary switch push button pressed?
True →
Pass current through; LEDs are lit
False
↓
Do not pass current through; LEDs are not lit
As mentioned earlier, Boolean logic is fundamental to electronics, not just computer science programming languages. Indeed, the world around us has many ways of moving from true/false, yes/no, one/zero. This is why Boolean logic quickly shifted the design of electronics and programming over to using base two binary notation.
When we count in binary, we move from columns representing ones, tens, and hundreds of base ten decimal notation, to columns representing ones, twos, and fours. Each column is known as a bit. Let’s see where that takes us, counting-wise, when each bit can only be a 0 or a 1:
Number
Fours bit
Twos bit
Ones bit
Decimal
Equivalent
Zero
0
0
0
= 000
One
0
0
1
= 001
Two
0
1
0
= 002
Three
0
1
1
= 003
Four
1
0
0
= 004
Five
1
0
1
= 005
Six
1
1
0
= 006
Seven
1
1
1
= 007
Note, then, that in binary we now have a “ones” column. It can only move from zero to one. So to get to the number two, we need a “twos” column. Moving it from 0 to 1 and moving the ones column from 1 to 0 gives us the number two. To move to three, we then keep the twos column at 1, and move the ones column back to 1.
But we’re at the end of what those two columns can reach. So we now need a “fours” column. Set the ones and twos columns back to 0, and move the fours column to 1. Ta-da! We’ve reached four. By switching the ones and twos column on and off, we can move the count all the way up to seven!
This demonstrates that a 3-bit counter can move between 8 different decimal numbers: 0, 1, 2, 3, 4, 5, 6, and 7. It also demonstrates that we haven’t even completed filling in the ones column in decimal, let alone moving to the tens or one hundreds columns of decimal notation.
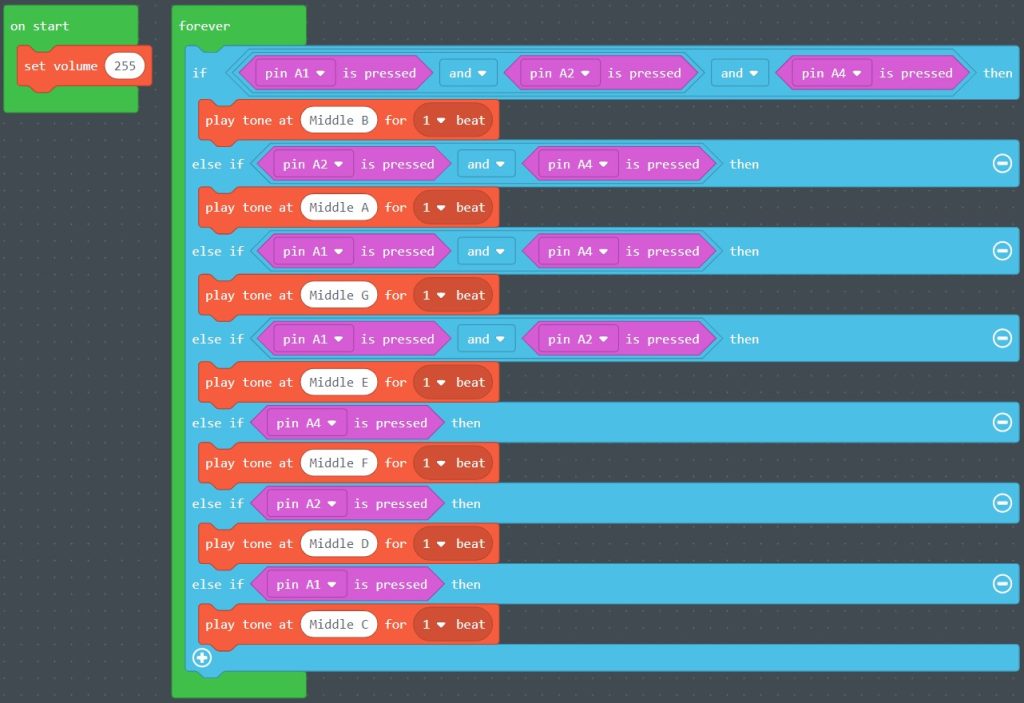
Exercise: Creating Code to Play a Full Middle C Scale
Let’s put this new Boolean logic and deductive reasoning into practice to play the full Middle C scale using the three “valves” of our Toolbox Trumpet or Circuit Playground Express. As this is a tool being designed first and foremost for educational purposes, let’s add in pin A4 along with pins A1 and A2.
Remember that order matters in Boolean logic:
Is pin A1 and A2 and A4 pressed?
True →
Play Middle B for 1/2 beat →
End
False
↓
Is pin A2 and pin A4 pressed?
True →
Play Middle A for 1/2 beat →
End
False
↓
Is pin A1 and pin A4 pressed?
True →
Play Middle G for 1/2 beat →
End
False
↓
Is pin A1 and pin A2 pressed?
True →
Play Middle E for 1/2 beat →
End
False
↓
Is pin A4 pressed?
True →
Play Middle F for 1/2 beat →
End
False
↓
Is pin A2 pressed?
True →
Play Middle D for 1/2 beat →
End
False
↓
Is pin A1 pressed?
True →
Play Middle C for 1/2 beat →
End
False
↓
End
Add in five more else “If…Then” block statements below the three we already have. Proceed to shuffle these so that the order goes as follows:
Save this project as TrumpetToolboxCScale, flash it to the Circuit Playground Express, and give it a test run.
Can you play all seven notes of a Middle C scale? Keep practicing until you can do this at a relatively good pace.
Getting in Your Groove
Feel encouraged to go into the MakeCode project and adjust the volume level that we configured in the “on start” loop. You may also want to consider adjusting the tempo at which the 1/2 beat is played. You can do this by pulling out a “set tempo to 120 (bpm)” from the “Tempo” section of the MUSIC category and adding it to the “on start” loop. Play the 1/2 beat slower by lowering the beats per minute to double or single digits. Or speed it up by raising the tempo to setting it somewhere over 200 bpm. Experiment with changing the beat from 1/2 in each of the if logic statements to something else of your choice, say down to 1/16th or up to 4. Test it out in the simulator with the Middle C, Middle D, and Middle F notes. Or test it out on the physical Circuit Playground Express by saving, flashing, and testing to hit your preferred Toolbox Trumpet performance metrics!
Key Takeaways
Computing devices like computers and microcontrollers use to represent numbers and letters. The fundamental Boolean logic used in electronics is founded on base two binary notation. signals like the capacitive touch sensors of the Circuit Playground Express also use binary.
The continuously variable physical quantities of the world, including the human senses, are .
Our Toolbox Trumpet now uses digital sensors on the Circuit Playground Express as conditional inputs to control the Hertz of the analog audio output of the Circuit Playground Express speaker.
The prevalence of the digital realm, and the notion that more recent generations are born digitally native, does not change the core of our physical being. But it does add additional tools in our toolbox for use in our everyday lives, some of which are truly valued in helping us reach our individual and community goals. We’re still physically analog. Or are we?
Has the creation and use of this digital trumpet shaped us in significant ways? How might we have been changed differently if this session had been conducted only using analog materials, for instance, using different lengths of wood to play different notes?
Wrap Up
The focus of this session was two-fold: First, to help us expand our understanding of the methodological landscape. This includes positivist paradigms, as related to programming code and Boolean logic, with interpretive paradigms, as related to meta-design and innovation-in-use, as well as critical paradigms that advance moral and ethical questioning to unmask and expose hidden forms of oppression. Second, to further our more holistic journey of recognition regarding the deep interconnectedness of the social and the technical, one that cannot be fully teased apart. At the same time, it is hoped this journey is now better facilitating our use of deductive reasoning to more effectively create programming code even as we work to use inductive and abductive reasoning to reflect on our sociotechnical artifacts as we continue to move from a thing-orientation to a person-orientation.
Comprehension Check
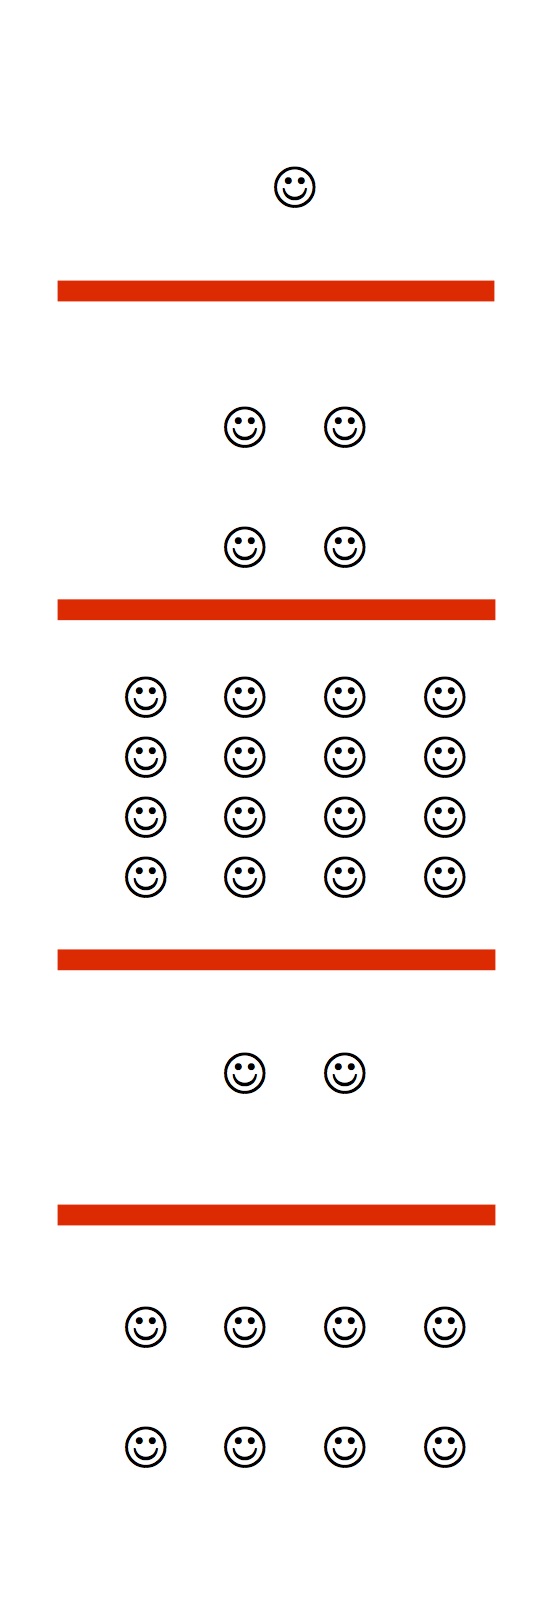
Binary Notation
Print out the above binary cards and use scissors to cut these at the red lines. Then use these as a binary counter, with the smiley faces up equaling a binary notation 1, and smiley faces down equaling a binary notation 0. Order them from right to left as shown below:
Decimal Notation
16s Bit
8s Bit
4s Bit
2s Bit
1s Bit
=
?
?
?
?
?
000
0
0
0
0
1
001
0
0
0
1
0
002
0
0
0
1
1
003
0
0
1
0
0
???
0
1
0
0
0
???
1
0
0
0
0
???
1
0
1
0
0
???
0
1
1
1
1
???
1
0
1
1
0
???
?
?
?
?
?
023
?
?
?
?
?
024
?
?
?
?
?
025
?
?
?
?
?
026
?
?
?
?
?
027
?
?
?
?
?
028
?
?
?
?
?
029
?
?
?
?
?
030
?
?
?
?
?
031
?
?
?
?
?
032
?
?
?
?
?
127
?
?
?
?
?
255
The Instructor Binary Cards may be helpful at the end of the above. By using these, you could count in binary notation from decimal zero to decimal 255, inclusive.
Next, drag the coding concept over to its matching block code. A single “drop zone” may have more than one right answer. Some coding concepts may be used more than once.
Use the book chapters and linked audio and video sources, and Blue Unit End Notes if you’re not quite sure. This is a great opportunity to come together in small groups to work on this learning check.
Maria Rosa Lorini, Amalia Sabiescu, and Nemanja Memarovic, “Collective Digital Storytelling in Community-Based Co-Design Projects: An Emergent Approach,” The Journal of Community Informatics 13, no. 1 (2017): 109–36. https://doi.org/10.15353/joci.v13i1.3296. ↵
Angelika Strohmayer and Janis Meissner, “‘We Had Tough Times, but We’ve Sort of Sewn Our Way through It’: The Partnership Quilt,” XRDS: Crossroads, The ACM Magazine for Students 24, no. 2 (December 19, 2017): 48–51. https://doi.org/10.1145/3155128. ↵
A control flow statement used to create a function that keeps running a sequence of code infinitely.
A Control Flow Statement that specifies the conditions under which one path or another should be taken.
A command that determines under which specific coding pathway should be executed based on the occurrence of another sequence in the program.
Repeating one step in a program multiple times.
A form of algebra used in mathematics, electronics, and computer hardware and software. At its base, all values are found to be either true or false using the Boolean operators "OR," "AND," and "NOT."
A unit of code defined by its role within a more general code structure. To execute the function, it is provided one or more inputs, and produces a concrete result. This result may, but is not necessarily required to, be returned back to the caller of the function.
A convenient name to represent numbers that change from time to time. Look at the top of your smartphone, and you may see the battery percentage charge remaining. A program exists on the smartphone to read this variable and provide a visual representation of it. Variables are often used within code to evaluate changes in patterns to determine which series of code should be executed at a given moment.
A control flow statement provides a choice between two or more paths, and defines the specific sequence in which individual statements within that path should be executed or evaluated.
Specific to electronics, a digital signal is a representation of a physical quantity expressed as a series of the digits 0 and 1, that is, binary. The range of decimal numbers representing physical quantities in our work, for instance 12 seconds, is converted to a binary equivalent--in this case, 1100. In this illustration, the dots along the analog sine wave are data points collected to create the digital representation of the physical quantities.
Electrical sensors are devices used to detect input from the physical environment. Light sensors might automatically turn on the headlights of your car, while heat and chemical sensors might turn on a fire alarm. And motion sensors might turn up the heating or cooling in a house, or might count how many people have passed through a gate to and from a library. The Circuit Playground Express that comes with the toolkit has a range of sensor inputs within this printed circuit board, including:
Analog light sensor to detect ambient light, with similar spectral response to the human eye.
Temperature sensor calculated using the analog voltage at a given moment.
Microphone audio sensor, which is a digital microphone that works similarly to the microphones built into our laptops and smartphones, but is smaller and less expensive, well-suited for this educational microcontroller.
Motion sensor using an accelerometer, detecting both motion and gravitational pull.
Seven capacitive touch sensors that can sense the touch of a person, human or otherwise.
Specific to electronics, an analog signal is any continuous electric pulse of varying amplitude. If we view a tone playing from a speaker as a sine wave, an increase in amplitude is equivalent to a louder sound from the speaker. An increase in the number of waves within a certain period of time is equivalent to a higher-pitched tone (perhaps from a middle C note to a middle E note). In these graphs of two different sine waves, the left sine wave plot shows increasing amplitude of the same tone while, the right sine wave plot shows a stable tone held at stable amplitude.
Boolean logic in which the output depends on the present input as well as a set history of the input.
Binary notation is based on the base-2 numeral system using only two symbols. The symbols used are the digits 0 and 1. Binary is the standard notation for Boolean true or false logic tests. This is in contrast to the base-10 numeral system commonly used in the English language, and which uses the digits 0, 1, 2, 3, 4, 5, 6, 7, 8, and 9.


