


Blue Unit: Computational Tinkering
4B: Raspberry Pi Counterstory Little Free Library
Background Knowledge Probe
- Which of your daily-use mechanical tools, if any, have attached digital electronic components? Think about this broadly, including your car or kitchen appliances, for example.
- Which of these digital electronics are microcomputers? Microcontrollers? A combination of the two?
- In what ways is the design and use of the digital component prioritized over the mechanical? The mechanical over the digital?
- In what ways are your daily-use tools, mechanical and digital, prioritized over the person? In what ways are your daily-use tools first and foremost person-centered?
Technical Overview
We’ve slowly been working towards creating a digital Little Free Library extension to the wonderful analog Little Free Libraries we find in many neighborhoods. Microcontrollers like the Circuit Playground Express provide a range of sensors and indicators that can be very useful to communicate back and forth with Little Free Library patrons. Microcomputers like the Raspberry Pi, on the other hand, serve as an e-library stacks, library catalog, chat room, and much more. Together, these can be hidden away in a toolbox and run with an extension cord or solar panel and battery pack. For now, our goal is to bring the Circuit Playground Express and Raspberry Pi together. We will set up the Circuit Playground Express to communicate through serial connection with the Raspberry Pi, and the Raspberry Pi to play MP3 audio recordings through its audio jack. In this exercise, we will begin to explore the possible relationships between a single-purpose computer, such as the Circuit Playground Express, and a multi-purpose computer, such as the Raspberry Pi.
Data Communications Between Devices
The Raspberry Pi, like many microcomputers and microcontrollers, provides pins to which you can attach transmit and receive wires to connect with personal computers. In this way, even if there is no network or keyboard, mouse, and monitor to provide access to one of these devices, a simple USB to serial cable can be used to configure, diagnose, or perform regular tasks on it. Many operating systems, such as the Raspberry Pi OS, also provide a control window to output and input text from and to the device through this serial interface.
A note on the technical terms Master and Slave:
- Historically, the technologists who developed these data communication tools used the term Master to indicate the controlling device and Slave to indicate devices being controlled by that device. I follow the lead of Python developers who, moving forward, are using the terms Parent and Worker, respectively. These changes within Python coding were made in November 2018, after heated discussion launched by a change request submitted in September 2018 by Victor Stinner, a developer with the software company Red Hat.[1]
- Other programming languages have implemented similar changes. Drupal uses the term replica to replace slave and primary to replace master. As another example, Django has moved to follower and leader.
- The terms still largely used within engineering and computer science remain slave and master. In discussions regarding these change requests, many argued that these common terms are used to refer to the operation of technology independent of, or at the direction of, another technology with no reference to human slavery. They argue that because there is no common replacement that could easily be made given the existing labels on electronics and in code back many decades, it is important to stay with the stock terminology.
- As you read through this document and look at abbreviations listed on your electronics and in code, note that sometimes the listed abbreviations — for instance MISO, below — do not align with written descriptions in this text — Parent In/Worker Out.
Communications between devices takes many shapes and forms using a range of protocols. Three of the most commonly used are:
- I2C (Inter-Integrated Circuit and pronounced I-squared-C) was developed in the early 1980s and is widely used to connect lower-speed peripheral to microprocessors and microcomputers using the bus topology (think of a physical bus you ride to travel with others between locations). It is designed to work over relatively short distances, and allows multiple “worker” integrated circuits to communicate with one or more “parent” integrated circuits. I2C only requires two wires and can support up to 1008 worker devices. It can also support multiple parent devices, allowing for more than one parent to communicate with all devices on the bus.
- SPI (Serial Peripheral Interface) is another widely used bus topology protocol used to send data between peripherals and microcontrollers/microcomputers. What is unique about SPI is that it uses a serial clock in addition to a MOSI (parent out, worker in) data line and a MISO (parent in, worker out) data line. The serial clock’s oscillating signal allows for data communications to occur synchronously. As with I2C, multiple workers can connect to a single parent. To accomplish this, a fourth line, SS or Worker Select, alerts a particular worker that it should wake up and send and/or receive data, as well as to detect that multiple workers are present.
- UART (Universal Asynchronous Receive Transmit) interfaces: UART is actually a microprocessor with a package of integrated circuits on a , along with program logic, and is used to attach serial devices to a computer. This allows the computer and attached devices to “talk” and exchange data. There is a range of USB (Universal Serial Bus) TTL (Transistor Transistor Logic) serial cables used to provide connections between USB and serial UART devices. For our purposes, UART is the simplest and a very effective strategy for basic work in the console window of the Raspberry Pi using a personal computer.
Exercise: The Circuit Playground Express Meets the Raspberry Pi
In the first three technical session chapters, we’ve explored MakeCode and configured our Circuit Playground Express microcontroller, eventually working to create our own functions. In this session, we’ll bring together the microcontroller and the Raspberry Pi microcomputer to allow us to use the “trumpet valves” to play selected counterstories saved on the Raspberry Pi. To do this, we’ll use the UART serial communications pins found on the Circuit Playground Express and the UART Python extension on the Raspberry Pi to transmit valve press sensor data from the Circuit Playground Express to the Raspberry Pi, and to then assess this data to choose which of the available MP3 counterstories to play using the audio output of the Raspberry Pi.
We’ll accomplish this in three steps:
STEP 1: Set up the Raspberry Pi to store and play counterstories using the VLC free and open-source, cross-platform multimedia player. This may have already been done previously, as it is an exercise within the Orange Unit.
STEP 2: Set up your Circuit Playground Express. The Toolbox Trumpet will now be expanded to use components of the MakeCode Serial UART Communications Extension to transfer capacitive touch and momentary switch data to the Raspberry Pi to play counterstories based on sensor inputs.
STEP 3: Use the Toolbox Trumpet to play short counterstories (no momentary switches pressed), introductions to the counterstories (left switch pressed), and extended counterstories (right switch pressed). A simple Python-based program has been included to test out the Circuit Playground Express, the USB to TTL serial cable, and the Raspberry Pi as a media center.
To work through these steps, it is now time to bring together the technical activities with the social activities. Work through these in pairs. Or perhaps before doing these activities in pairs, join in a community of practice to consider ways to approach this within a diversity of community cultural wealths that are present. This is to be a work not of doing alone, but of being present within the space, with the people in this room. The book Emergent Strategy highlights several principles relevant in considering technical activities within a community of practice, and a community of practice as something that is completed through being present rather than as driven-doing acts. These include:
There is always enough time for the right work.
There is a conversation in the room that only these people at this moment can have. Find it. Never a failure, always a lesson.
brown, adrienne maree. Emergent Strategy (p. 44). AK Press. Kindle Edition.
How can the following be accomplished in such a way that the community cultural wealth of all present are advanced as part of taking on these activities collaboratively?
How can this be part of a larger task of advancing a counterstory regarding sociotechnical innovation-in-use?
Step 1: Transfer MP3 Files to the Raspberry Pi
If you haven’t been using the Raspberry Pi since the end of the Orange Unit, it might be helpful to review Orange Unit 4B: Meet the Microcomputer, including videos found within the chapter, and Exercises found in Orange Unit 4C: Getting Started with the Raspberry Pi.
- If you need help using RealVNC (Virtual Network Computing) on your laptop to serve as the keyboard, mouse, and monitor interface with the Raspberry Pi, review the later steps in the Exercise: First Boot of the Raspberry Pi OS.
- If you are now connected to a different Local Area Network (LAN), you’ll need to connect the Raspberry Pi to a keyboard, mouse, and monitor temporarily to get it to connect to that network. If you have problems getting the monitor to serve as a screen for the Raspberry Pi in this new location, you’ll find FAIL FORWARD Tips in the Exercise: First Boot of the Raspberry Pi OS.
- If you need help using the PiOLED to identify the IP address so that you can reconnect the VNC View on your laptop to the VNC server on your Raspberry Pi, review Exercise: Adding an Adafruit PiOLED Text Display.
With the Raspberry Pi up and running, the first step is to set up a folder called “cstories” in the home directory of your Raspberry Pi, containing your counterstory MP3 files. You may have completed this step as part of the Orange Unit. If not, jump to Coding Electronics. In the steps below, we’ll continue working with this folder.
pi@raspberrypi:~ $ mkdir cstories
pi@raspberrypi:~ $ cd cstories
pi@raspberrypi:~/cstories $ ls
  cStory1.mp3  cStory1-extended.mp3   cStory1-intro.mp3
pi@raspberrypi:~/cstories $
Transferring files from your laptop or other source will depend on a number of factors. For many, the File Transfer toolbar button in the VNC Viewer dropdown window has worked exceptionally well when VNC Viewer on your laptop is connected to the VNC server on the Raspberry Pi.[2] Others have saved files in a central course Learning Management System (LMS) or “Cloud” storage space such as Box. These files can then be downloaded to the Raspberry Pi using the Chromium web browser preinstalled within the Raspberry Pi OS. For those familiar with the Linux command line, another way is to make use of the SCP command.
However you do this, make sure to transfer your .mp3 counterstories to the /home/pi/cstories subdirectory.
NOTE regarding the naming of your counterstory files:
- The prefix of your counterstory files should be “cStory”, where lower and upper cases do matter, as Unix and Linux-based operating systems are case-sensitive. The applications and Python code we run later will use a matching case-sensitive naming structure.
- Next, add a number between 1 and 7, with 1 being the first story told when the A1 is pressed on the Circuit Playground Express, and 2 being the second story told when the A2 is pressed, etc.
- The postfix of the filename is .mp3. For the two- to three-minute main part of the story, for the first counterstory to be told, you would now see the name:
cStory1.mp3
- If it is the short introduction to the story, add a -intro between the story number and the postfix. The name of the introduction to the first story would thus be:
cStory1-intro.mp3
- If it is the part providing the listener with further information, add a -extended between the story number and the postfix. The name of the additional information on the first story would thus be:
cStory1-extended.mp3
A quick way to test this out is by playing your MP3 file using the VLC media player, which runs either as a graphical display (VLC) or as a command-line program (CVLC), which is what we’ll run from a terminal window:
pi@raspberrypi:~ $ cd cstories
pi@raspberrypi:~/cstories $ cvlc cStory1.mp3 vlc://quit
FAIL FORWARD TIP: You may need to right-click on the Volume control icon at the upper right of the Raspberry Pi menu. Doing so will show you the available audio ports, by default “AV Jack” and “HDMI.” Plugging in a USB Headset or some speakers will add further options, from which you can hear the story currently being played by CVLC. Be sure to choose the right option for the media player you are wanting to use.
Step 2: Set Up Your Circuit Playground Express
On your laptop, make the following update to the Circuit Playground Express so that it can work with the Raspberry Pi to play counterstories:
- Download the 4-Octave Trumpet Counterstory UART Prototype for the Circuit Playground Express: https://go.illinois.edu/CPE_4OctavePlusUART
- Review the new conditional that has been added to the MakeCode, building from the previous Toolbox Trumpet 4 Octave exercise. In this case, we now do a serial write of data whenever the capacitive touch sensor count is greater than zero. This is possible because within the Advanced section, we’ve taken a serial redirect Configuration block and added that to the On Start function. (NOTE: The first time it is used, you need to go into +EXTENSIONS to find Serial. From then on, it will be located directly within Advanced.)
- Connect the Circuit Playground Express to your laptop via the microUSB to USB cable and flash the new UF2 to your Circuit Playground Express.
- Note that you now need to move the off/on switch on the Circuit Playground Express to on to hear the audio playback of the trumpet. Turn this on and double-check that you can still play the notes.
- Disconnect the microUSB to USB cable.
Step 3: Use the Toolbox Trumpet to Play Your MP3 Files
Now let’s connect up your Raspberry Pi to your Circuit Playground Express using a USB to TTL cable and some male to alligator clips. You will now provide power to the Circuit Playground Express directly from the Raspberry Pi via the USB port, by connecting the red TTL wire to the VOUT on the Circuit Playground Express using a fourth male to alligator clip wire. In this way, one power source directly attached to the Raspberry Pi is all that is needed to run the whole digital Little Free Library!
NOTE: Do not connect the red wire to VOUT power if your Circuit Playground Express is getting power from another source, such as your laptop.[3]
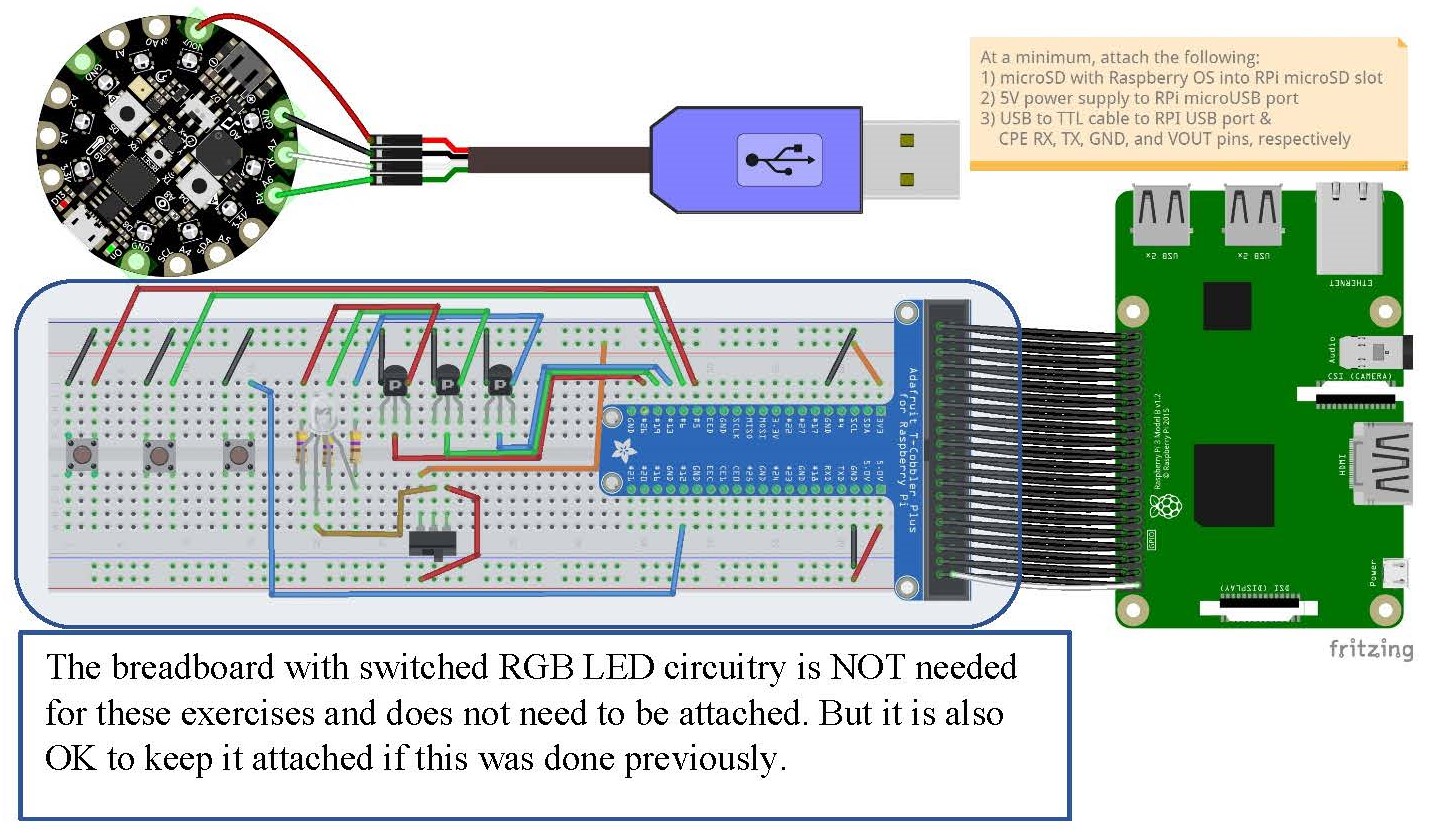
- Use three or four male to alligator clip wires to connect the TTL side of a TTL/USB Serial Cable to the Circuit Playground Express microcontroller:
- Black wire to ground (GND)
- Red wire to power (VOUT) (do NOT connect if Circuit Playground Express is getting power from another source, such as your laptop)
- White wire to transmit (TX)
- Green wire to receive (RX)
- Plug the USB side of the second serial cable to one of the four USB ports on the Raspberry Pi. Any one of these should work OK. You should see the Circuit Playground Express green power light go on. If not, a few tests can include:
- Confirm that there is power on the Raspberry Pi and that it is not in the boot-up phase.
- Check to see if the cable USB is fully pressed into the USB port of the Raspberry Pi.
- Try using a different USB port on the Raspberry Pi.
- Confirm that the GND and VOUT pins are properly connected to the red and black wires on the TTL/USB serial cable.
- From a web browser, enter: https://go.illinois.edu/cstories
- Take a glance at the code, but most importantly, right-click in the window to download the program as
cstories.py(not as cstories.txt as automatically listed).- Make sure to move cstories.py to the /home/pi/Code/Python directory,
- You can download the Python code in several ways:
- Directly from the Raspberry Pi’s Graphical User Interface, using a web browser on the Raspberry Pi.
- By downloading it to your laptop’s cstories folder, and then transferring the file using the USB to TTL serial console connection.
- By downloading it to your laptop’s cstories folder, and then transferring the file using SSH/SCP (secure shell and secure copy) in a terminal (Mac) or PowerShell (Windows 10) window. For this approach, first identify the IP address of your Raspberry Pi. Jump to Network Troubleshooting for instructions. Visit Introducing the Unix Command Line for details on using SSH/SCP.
- The cstories.py code does an import of two libraries with supplemental code: one library for serial communications, which we’ll use to communicate with the tty to UART cable, and the second for the VLC library of commands. The serial library comes pre-installed, but we now need to install the VLC library using pip3:
pi@raspberrypi:~ $pip3 install python-vlc - If you have more than one cstory with intro, main, and extended files, open cstories.py with Thonny or the graphical editor mousepad to edit the Python code. Change the variable “numStories” from 1 to the number of cstories now on the Raspberry Pi.
pi@raspberrypi:~/cstories $ mousepad /home/pi/Code/Python/cstories.py- Navigate to the row that starts “numStories.” Navigate to the number 1, and change it to the number of stories you have transferred to /home/pi/cstories.
- To save in mousepad, click on the Save button and then close the window.
- To save in Thonny, click on the Save button.
- Take a glance at the code, but most importantly, right-click in the window to download the program as
- Test it all out in either Thonny or the Terminal:
- In Thonny, you can click on the Run icon. Look in the Shell window in the bottom half of Thonny to see the output that would normally go to a terminal window.
- In the terminal window, type the following, and then touch the different Toolbox Trumpet valves to see if you can hear a story being read to you:
pi@raspberrypi:~/cstories $ python3 ~/Code/Python/cstories.py- To exit the Python command output, provide a keyboard interrupt by holding down the Control (that is, CTRL or ^) key, and then hitting the “c” key.
FAIL FORWARD TIPS:
- Sometimes, the connection of the USB/TTL Serial Cable from the Circuit Playground Express to the Raspberry Pi may have changed. In the terminal window on the Raspberry Pi, type:
pi@raspberrypi:~ $ ls /dev/ttyUSB*Note the result. If nothing is listed, then the USB/TTL Serial Cable may not be connected. Otherwise, compare the returned value(s) with the one listed in the “uart” variable within the cstories.py code. The best way to do this is by using nano. If the value returned from the “ls” command is different from that listed in “uart = serial.Serial,” then change the number accordingly in the Python code, save, and retest.
- The cstories.py code does not have a way to cut short the playing of a selected story. The VLC player also can handle the playing of multiple stories by default. Stop the cstories.py prototype to end the telling of one story early, and restart the Python program again to start a new story with the A1, A2, and A4 key combinations, along with Button A or Button B as needed.
From Here
If you’ll be jumping in and out of your Raspberry Pi periodically, feel encouraged to leave it powered on, just as you would any server. Exit VNC Viewer or close out of your ssh connection to the Raspberry Pi by hitting ^D (that is, holding down the Control key and hitting the ‘d’ key), or by typing logout. Either way, you should see the following window display at the end, making it possible for you to reconnect via VNC or SSH back in via Terminal or PuTTY whenever you need to.
Wrap Up
The primary objective of the Blue Unit is to bring together our microcontroller and microcomputer systems as a means of sharing data between devices, thereby creating a basic physical network. That is, we’ve worked to create a digital networked information system. Together, we can advance a range of technical skills in addition to a number of cognitive and socio-emotional skills to help your community of practice use a growth mindset to build these multi-layered systems.
Do Something New!
Entering into this final stage putting together a Raspberry Pi Counterstory Little Free Library, there have been a range of expertise and community cultural wealth brought into the activities as a team. For some, strengths may especially be in the computer programming front. For others, you may bring with you a background within issues of social justice. Consider also the diverse lived experiences, cultures, and other influences that have shaped your selection of a story that you have turned into one you would tell through this sociotechnical system.
- How might you now work together to create a series of seven stories selected to especially speak to a special audience?
- Which would play with A1, that is cStory1?
- A2, that is cStory2?
- A1 + A2, that is cStory3?
- A4, that is cStory4??
- A1 + A4, that is cStory5?
- A2 + A4, that is cStory6?
- A1 + A2 + A4, that is cStory7?
- What would play if someone simultaneously pressed both Button A & B? How might this be used as a secret “Easter Egg” part of the story (Easter Egg is a gaming metaphor for a hidden aspect).
The exercises have stepped you through the sharing of this story through integration of the Circuit Playground Express UF2 code and the Raspberry Pi Python code. The Python code itself provides opportunities to share between 1 and 7 different stories headless, that is without a monitor. But as we learned in Orange Unit 4C: Getting Started with the Raspberry Pi, Python also has a library file to work with a the PiOLED we’ve been using to identify the IP address assigned to the Raspberry Pi.
- How might you reuse the PiOLED to instead indicate a list of stories and to share which story is currently being played?
- Are there ways we could use a small, low-powered monitor attached to the Raspberry as part of a portable Little Free Library to indicate a list of stories and to share which story is currently being played?
As you explore this Do Something New! be sure to use the various strengths of your team, and seek to bring in other expertise as possible, to investigate and prototype these possibilities of a sociotechnical system to share seven strategically selected critical social justice stories within a person-oriented social perspective.
Comprehension Check
Now would be a great time to revisit the lesson plan listed in “Valued, Inclusive Information and Computing Technology Experiences.” Spend some extended time with your Professional Journal Reflections this week, especially responding to the probes at the end of that session. As you reflect, bring our activities to date into conversation with the capability approach and inclusive computational thinking frameworks brought forward in this session.
- In what ways might the toolbox trumpet and Raspberry Pi counterstories serve as a resource advancing agency? A capability?
- In what ways might the toolbox trumpet and Raspberry Pi counterstories serve as an information system problematically disrupting valued beings and doings of individuals and communities?
- In what ways might the toolbox trumpet and Raspberry Pi counterstories be designed for designers, that is, for the innovators-in-use who adapt this to their own functionings? In what ways might it have been designed differently leading to this point?
- Daniel Oberhaus, “‘Master/Slave’ Terminology Was Removed from Python Programming Language,” Vice, September 13, 2018. https://www.vice.com/en_us/article/8x7akv/masterslave-terminology-was-removed-from-python-programming-language. ↵
- The instructions for enabling the VNC Server Interface on the Raspberry Pi and for setting up the VNC Viewer on your laptop can be found starting at STEP 5 of the Exercise: First Boot of the Raspberry Pi OS in Orange Unit 4C: Getting Started with the Raspberry Pi ↵
- Fritzing breadboard graphics are licensed under CC-BY-SA 3.0. ↵
Integrated circuits (ICs) are semiconductor wafers which contain a collection of tiny resistors, capacitors, and transistors. These can then be built to serve a wide range of electronic functions. In practice, larger-sized electronic components used to build circuits are first tested using materials like breadboards for rapid prototyping. They are then redesigned to be built into integrated circuits and optimized for regular, more standardized use. At times, a mix of electronic components along with integrated circuits are themselves used on breadboards to do further rapid prototyping of yet larger circuitry. The 5-Key Capacitive Touch Sensor included in the kit for this book contains a mix of integrated circuits. Examples of integrated circuits include processors, memory, and controllers.
A printed circuit board is a board base made of fiberglass or glass-reinforced plastic, with one or more layers of copper or other conductive traces placed on one or both sides of the board base. If you've ever tie-dyed a shirt, you've got a good starting point for considering the printing process of a circuit board. Individual electronic components and integrated circuits are then soldered onto specific trace paths to build complex electronics. A small printed circuit board was used to build the 5-Key Capacitive Touch Sensor used in our kit.
